Few makeup techniques carry the staying power of a well-executed wing. From the dramatic cat eyes of the 1960s to the refined, architectural liner looks dominating runways and social feeds in 2026, the winged eyeliner has never truly gone out of style — it has simply evolved. This year, wings are getting bolder, thicker, and more intentional, with makeup artists experimenting with extended outer corners, graphic angles, and playful variations that move well beyond the classic flick.
The challenge that stops most women from fully embracing this look is not a lack of desire — it is a lack of understanding about how to adapt the wing to their specific eye shape. A wing that looks stunning on an almond eye can make a hooded eye disappear entirely. An angle that elongates a round eye can make a downturned eye look even more downturned. Getting the wing right is not just about technique — it is about knowing which technique to apply to which eye shape. This guide covers both.
Understanding Your Eye Shape Before You Wing It
Before applying a single stroke of liner, identifying your eye shape is the most important step you can take. Eye shape determines the angle of your wing, where it should start, how long it should extend, and how thick it should be at the lash line. Working against your eye shape produces frustration and results that never quite look right — working with it produces a wing that appears custom-designed for your face.
How to Identify Your Eye Shape
Look straight into a mirror with a relaxed, neutral expression. The key features to observe are the following. Almond eyes have a slightly tapered shape at both corners with the widest point at the center — the most common and versatile eye shape. Round eyes appear more circular with a visible white below the iris when looking straight ahead. Hooded eyes have a fold of skin that covers part or all of the upper lid when the eye is open. Monolid eyes have little to no visible crease and a flatter lid surface. Downturned eyes have outer corners that angle slightly downward compared to the inner corners. Upturned eyes have outer corners that sit higher than the inner corners. Close-set eyes have less than one eye-width of space between them, and wide-set eyes have more.
Many people have a combination of these characteristics — hooded and downturned, for example, or almond and wide-set — and the tips for each can be layered together for a result that addresses all your specific features simultaneously.
The Right Tools Make Everything Easier
Wing application is as much about the tool as the technique. The liner format you choose will directly influence how much control you have, how long the result lasts, and how easy it is to correct mistakes.
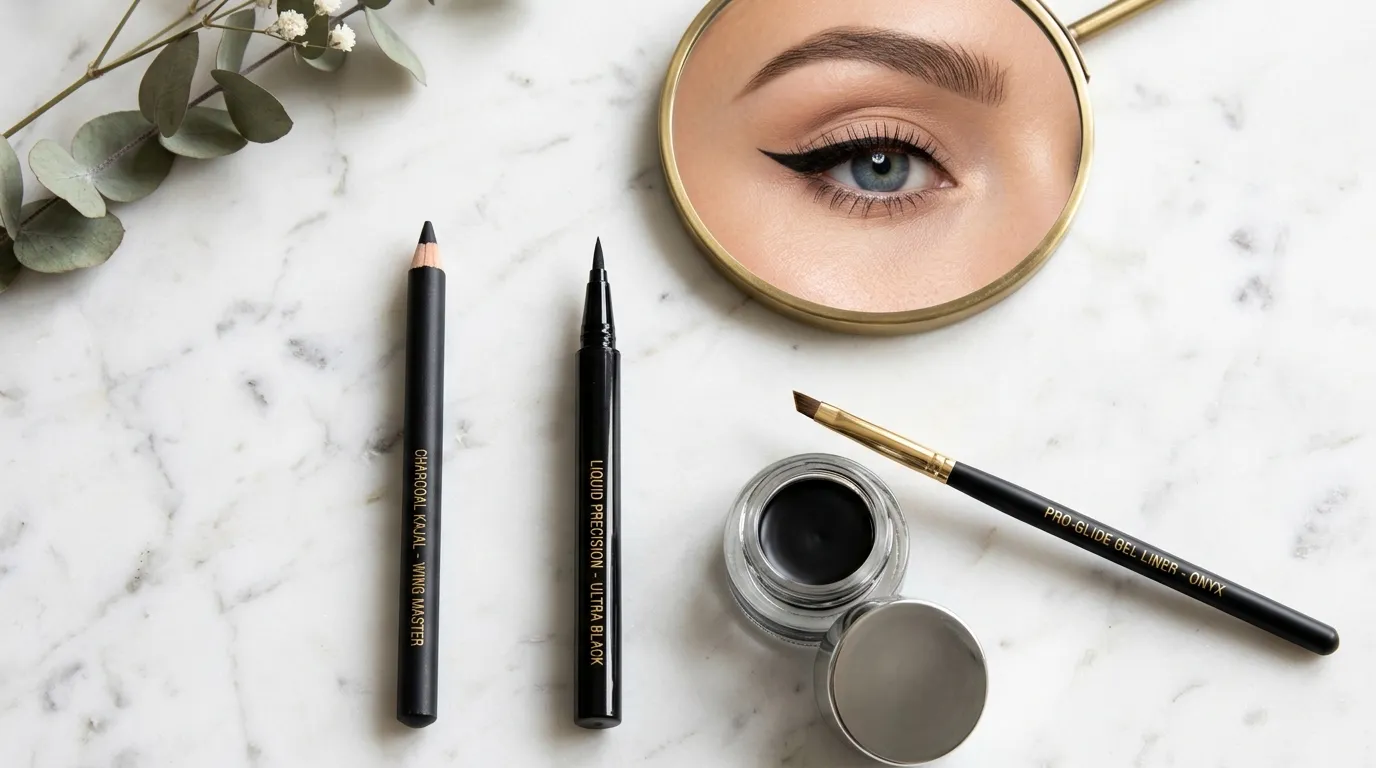
Liquid Liner with a Felt Tip
A felt-tip liquid liner is the most beginner-friendly option for creating a clean, defined wing. The felt tip acts like a pen — it delivers consistent pigment with each stroke and the tip is firm enough to guide precisely along the lash line. Look for a fine or medium tip rather than a brush tip for your first attempts. Fine tips give more control over the wing shape; brush tips offer more flexibility once you are experienced but require more technique to keep precise.
Gel Liner with an Angled Brush
A gel liner pot used with a thin angled brush gives the most control over wing thickness and shape of any liner format. The brush allows you to build the wing in stages — thin at the tip, thicker at the base — and the gel formula stays workable long enough to correct mistakes before it sets. This is the format most professional makeup artists use for editorial and runway wing looks, and it rewards the time invested in learning it.
Pencil Liner
A pencil liner is the most forgiving format for beginners because mistakes smudge away easily before the product sets. It is not ideal for a razor-sharp wing, but for a softer, slightly smudged wing — which is very much on trend in 2026 — a waterproof pencil can produce beautiful results with significantly less pressure than a liquid or gel formula.
Winged Eyeliner Technique: The Foundation Steps
Regardless of eye shape, every winged liner application starts with the same foundational sequence. Mastering these basics before adding shape-specific adjustments gives you a reliable starting point every time.
Step 1 — Map the Wing Angle First
Before drawing any liner along the lash line, establish your wing angle first. Hold your liner tool at the outer corner of your eye and angle it upward toward the tail of your eyebrow — this natural angle gives you the directional guide for your wing. Many people draw the wing tip as a small mark or short stroke at this angle before connecting it to the lash line, rather than trying to draw the whole wing in one continuous stroke from inner to outer corner. Working from the outer corner inward is almost always more controlled than working from inner to outer.
Step 2 — Draw the Upper Edge of the Wing
Starting from your wing tip mark, draw the upper edge of the wing back toward the lash line — connecting the tip to the point where your lash line ends at the outer corner. This upper edge defines the shape and angle of the wing. Keep this stroke as clean and single as possible rather than building it with multiple strokes, which tends to produce jagged edges.
Step 3 — Fill In the Wing Body
Fill in the triangular space between the upper edge you have just drawn and the lash line below it. Work in small strokes from the tip toward the lash line, keeping the fill as solid and opaque as possible. Any gaps or thin patches in this area will be visible and will undermine the crispness of the final result.
Step 4 — Line the Upper Lash Line
Working from the inner corner outward, draw a line along the upper lash line connecting to the base of the wing you have already created. Start as thin as possible at the inner corner and gradually increase the thickness as you approach the outer corner — this graduated thickness is what creates the classic lifted, elongated effect of a well-executed wing.
Step 5 — Clean Up the Edges
Dip a small flat brush or cotton swab into micellar water or makeup remover and use it to sharpen the underside of the wing and clean up any wobbles along the lash line. This clean-up step is used by professional makeup artists on every single liner application — it is not a sign of failure, it is part of the process. A sharp, clean lower edge on the wing is what separates an amateur result from a polished one.
Winged Eyeliner Adjustments for Every Eye Shape
With the foundation technique established, the following shape-specific adjustments are where your wing transforms from a generic liner look into something that genuinely flatters your individual features.
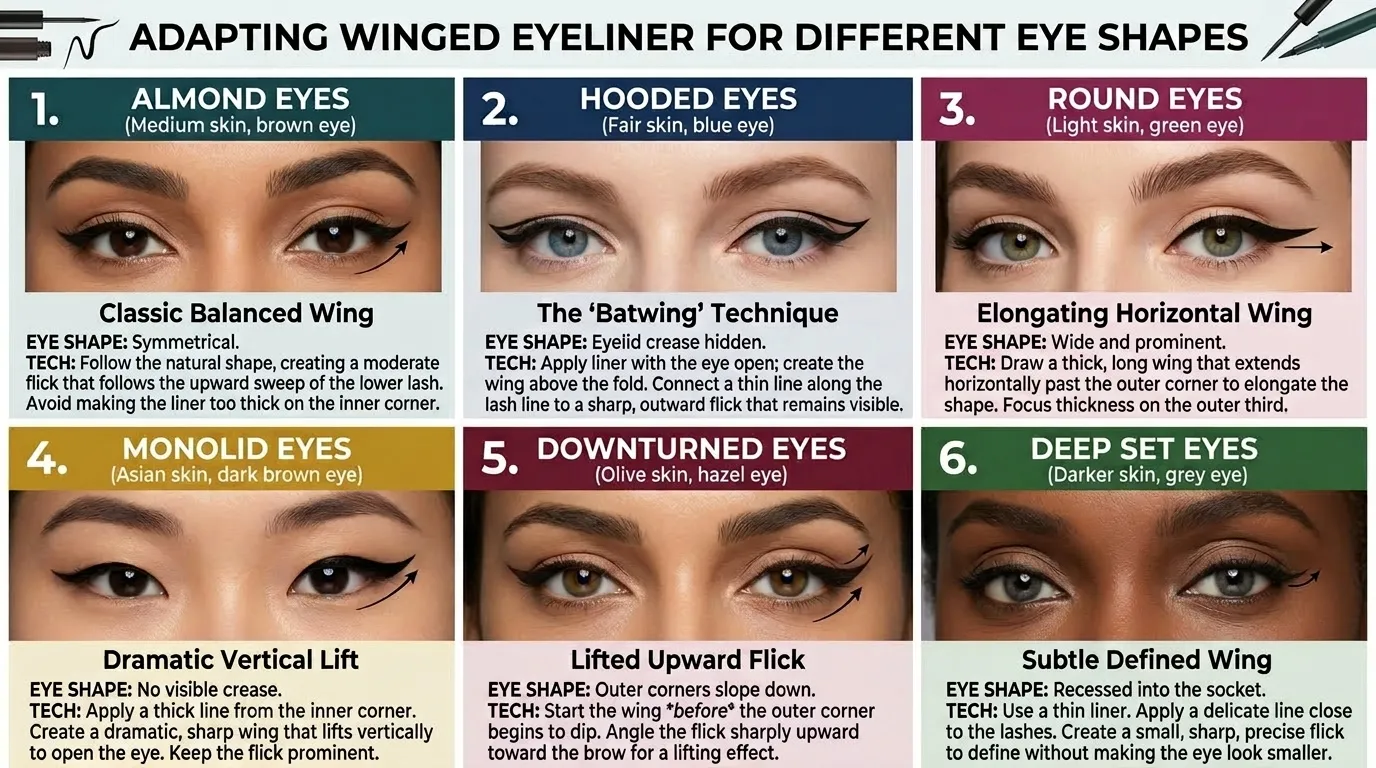
Almond Eyes
Almond eyes are the most versatile shape for winged liner — almost any wing style works. For a classic result, extend the wing at a 45-degree angle upward from the outer corner, keeping a moderate length and a graduated thickness from thin at the inner corner to medium at the outer base. For a 2026 update, try a slightly thicker wing base and a longer, more extended tip that creates a graphic, statement effect without losing the naturally elongated quality of the almond shape.
Round Eyes
The goal on round eyes is elongation — making the eye appear more almond-shaped by pulling the visual width outward. Extend your wing longer than you might on other shapes and angle it more horizontally than vertically. A wing that shoots upward at a steep angle on round eyes can make them appear even rounder — keep the angle low and the length generous. Keeping the inner corner liner very thin or skipping it entirely emphasizes the outward elongation further.
Hooded Eyes
Hooded eyes are the most technically challenging shape for winged liner because the hood covers part of the lid when the eye is open — meaning any wing drawn on the lid itself becomes invisible in real life even if it looks perfect in the mirror with your eyes relaxed. The key adjustment is to draw your wing with your eyes open rather than closed or relaxed. Look straight ahead into your mirror and draw the wing on the visible portion of the lid — angled upward and slightly above the natural lash line to ensure it clears the hood. The wing will look oddly high when your eye is relaxed but will sit perfectly when open. Keep the wing relatively short and the angle steep to maximize visibility.
Monolid Eyes
Monolid eyes have a flatter lid surface with no visible crease, which actually makes them an ideal canvas for bold, graphic liner work. A thicker wing base that gradually tapers to a fine tip creates beautiful definition and visible shape on a monolid. Because there is no crease to reference for placement, focus on creating a liner that sits close to the lash line at the inner corner and widens gradually toward the outer corner — this creates the illusion of depth and dimension on a flatter lid surface. Extended, elongated wings look particularly striking on monolid eyes.
Downturned Eyes
For downturned eyes, the wing must work against the natural downward angle of the outer corner to create a lifting effect. Draw your wing angling upward — more steeply than you think necessary — from a point slightly before the outer corner of the eye rather than at the very outer tip. Starting the wing slightly inward from the true outer corner and angling it firmly upward counteracts the downward pull and creates the visual lift that makes downturned eyes appear more open and awake. Avoid following the natural line of the lower lash at the outer corner, as this pulls the wing downward and emphasizes rather than corrects the drooping effect.
Upturned Eyes
Upturned eyes have a natural lift at the outer corner that can make a standard upward-angled wing look overly sharp or exaggerated. Balance this by keeping your wing angle lower and more horizontal — almost parallel to the lower lash line. A wing that follows the natural upward angle of an upturned eye too closely can make the eye appear catlike in a way that reads as severe rather than refined. A subtle, elongated horizontal wing creates a more balanced and flattering result.
Close-Set Eyes
For close-set eyes, concentrate your liner weight at the outer half of the eye and keep the inner corner as bare or as thin as possible. A generous, extended wing at the outer corner draws the visual focus outward and creates the illusion of more space between the eyes. Avoid any thick liner at the inner corner — it closes the eye inward and makes close-set eyes appear even closer together.
Wide-Set Eyes
Wide-set eyes benefit from liner that draws attention inward. Apply your liner fully from the inner corner — even slightly extending into the inner corner with a small flick — and keep the outer wing relatively short and modest. The liner at the inner corner creates inward visual weight that draws the eyes closer together for a more balanced appearance.
2026 Wing Variations Worth Trying
The classic cat eye remains as relevant as ever in 2026, but the year’s most interesting liner looks push the wing into new territory. These variations use the same foundational technique with creative adjustments that give the classic wing a fresh, modern feel.
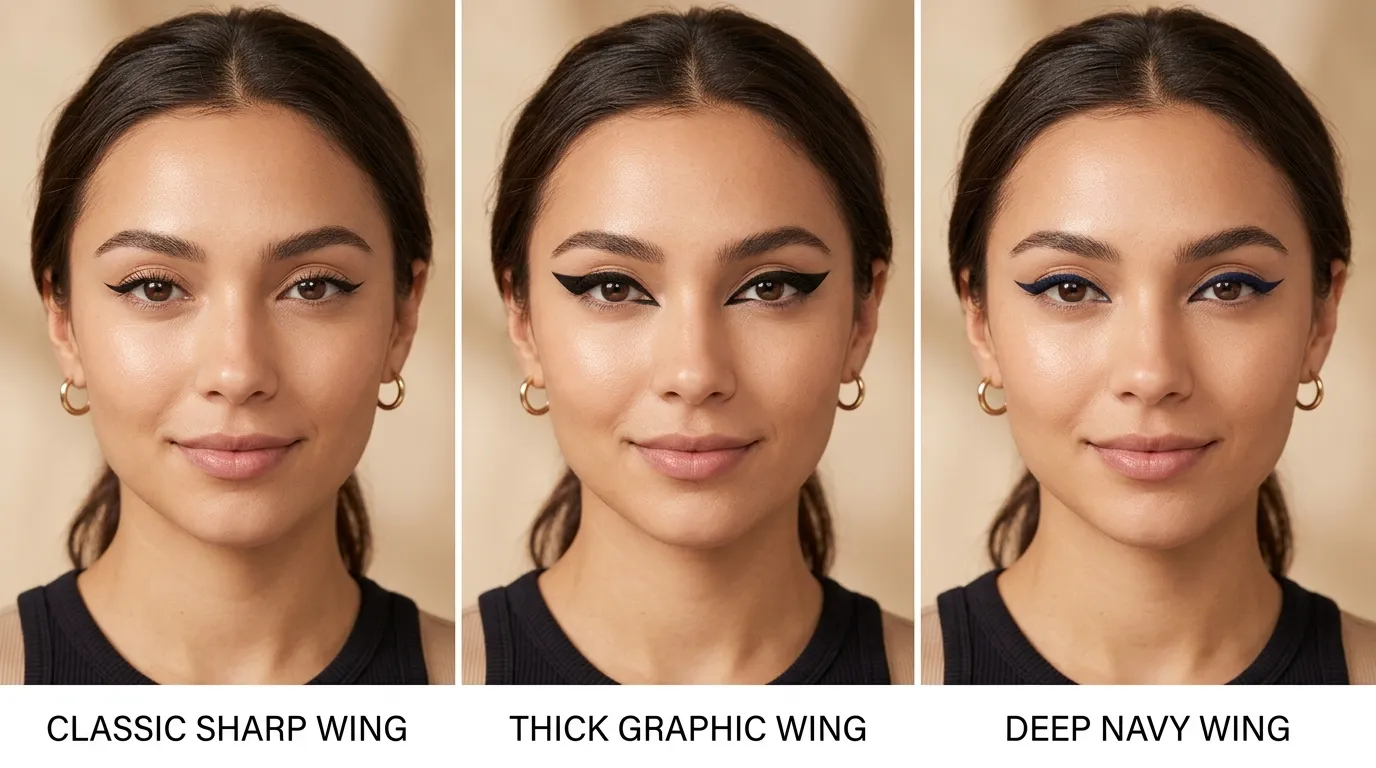
The Graphic Thick Wing
Inspired by runway looks from major fashion houses, the thick graphic wing features a significantly wider base — sometimes three to four times the thickness of a classic wing — that tapers to a clean, sharp tip. The drama comes from the base thickness rather than the length. This variation works particularly well on almond and monolid eyes and pairs best with minimal other eye makeup so the liner remains the clear focal point of the look.
The Floating Wing
A floating wing is drawn above the lash line with a small gap of visible lid between the liner and the lashes — creating the illusion that the wing is hovering above the eye rather than sitting on it. This editorial technique has been seen across major runway shows and works especially well on hooded eyes where a traditional lash-line wing disappears under the hood. The floating placement keeps the liner visible when the eye is open.
The Colored Wing
Swapping classic black for deep navy, rich plum, forest green, or warm brown brings the classic wing into 2026’s color-forward beauty moment without requiring any change to technique. A colored wing pairs beautifully with otherwise minimal eye makeup — the color itself provides enough interest that heavy eyeshadow is completely unnecessary. Navy liner on blue eyes, deep plum on brown eyes, and forest green on hazel eyes each create a complementary contrast that enhances the iris color in a way black liner simply does not.
Common Wing Mistakes and How to Avoid Them
Even with the right tool and the right technique, a few persistent mistakes catch most beginners at some point. Knowing them in advance saves significant frustration.
Uneven Wings on Both Eyes
Asymmetrical wings are the most universally shared struggle in liner application. The most reliable solution is to work on both eyes simultaneously rather than completing one fully before starting the other — draw the wing tip on the right eye, then mirror it on the left before moving to the next step. This parallel approach catches asymmetry early when it is easy to correct rather than after one eye is fully complete. As makeup artists often say — they are sisters, not twins. A small degree of asymmetry is normal and unnoticeable in real life even when it is glaring in close-up mirror examination.
The Wing Points Downward
A wing that droops rather than lifts is almost always caused by following the natural angle of the lower lash line rather than angling upward independently of it. Before drawing the wing, consciously identify the angle you want and commit to it — angling toward the tail of your eyebrow rather than following the lower eye line. For downturned eyes especially, this requires a deliberately steep upward angle that will feel exaggerated in the mirror but will appear perfectly balanced when you step back and look at the full face.
The Liner Transfers to the Upper Lid
Transfer — where wet liner stamps onto the upper lid when you blink or close your eye — is a formula and drying time issue. Allow liquid liner to dry fully for at least thirty seconds before blinking. Setting the liner with a matching dark eyeshadow pressed over the top also helps prevent transfer and significantly extends wear time. If transfer is a persistent problem regardless of drying time, switching to a gel formula typically resolves it.
For a complete picture of how your liner choice interacts with your lash extensions, lash lifts, and overall eye look — and how to keep both looking their best together — the guide on eyelash extension aftercare for beginners covers the daily care steps that protect both your liner work and your lash investment simultaneously. For the most authoritative and consistently updated guidance on eyeliner techniques, formulas, and tools from professional makeup artists, the Byrdie complete guide to applying eyeliner is one of the best references available. And when you are ready to build the full eye look around your wing, the step-by-step smoky eye guide for beginners covers how to layer eyeshadow and liner together for a polished, cohesive result.
Your Perfect Wing Is Worth the Practice
The winged eyeliner is one of those techniques that genuinely rewards persistence. The first few attempts will teach you more about your own eye shape, your tool control, and your preferred wing style than any guide can predict in advance. Give yourself the grace of a learning curve — use a makeup remover wipe on the days it goes sideways, try again the next morning, and pay attention to what changed between the attempt that did not work and the one that did. Within a handful of practice sessions, your hands will begin to remember the motion and the angle, and what once felt impossibly precise will become a reliable, repeatable part of your daily routine.