
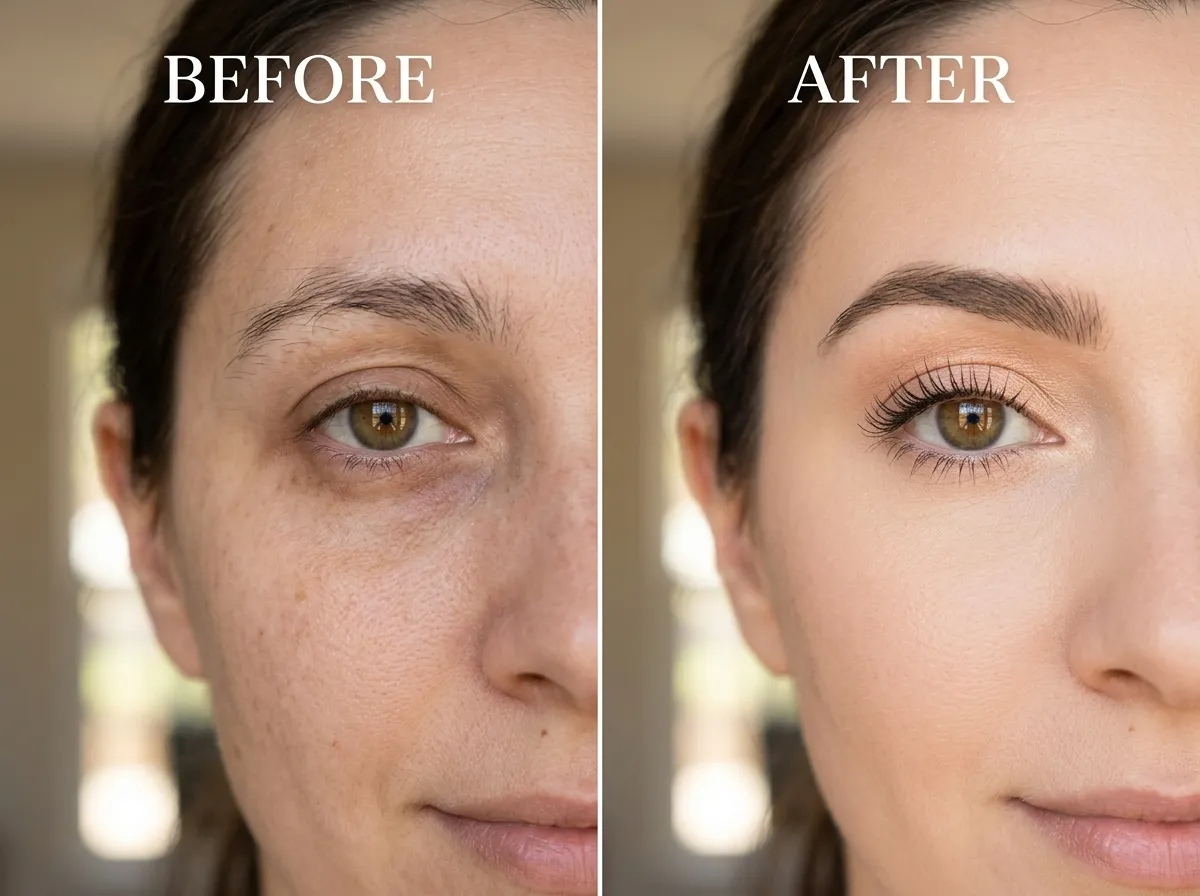
The no-makeup makeup look is one of the most requested and most misunderstood beauty aesthetics of the past decade — and in 2026, it has never been more relevant. The goal is not to look like you are wearing nothing. The goal is to look like the best possible version of your natural face — skin that glows, eyes that are open and defined, lashes that look naturally full, and brows that appear effortlessly groomed. It is a look that takes real skill to execute well precisely because all of the effort must become completely invisible in the final result.
For the eye area specifically, the no-makeup makeup look requires a carefully considered approach. Use too little product and the eyes look tired or undone. Use too much and the natural illusion collapses entirely. This guide walks through every step of creating a genuinely convincing no-makeup eye look — from brow grooming through to lash finishing — so the result reads as natural effortlessness rather than either bare neglect or visible makeup.
The Philosophy Behind the No-Makeup Eye Look
Understanding what the no-makeup makeup look is actually trying to achieve makes every product and technique choice significantly clearer. The aesthetic is not about minimalism for its own sake — it is about enhancement without evidence. Every product used serves the purpose of making a natural feature appear more vivid, more defined, or more polished than it would be without any intervention — but in a way that reads as the natural state of the face rather than as applied makeup.
For the eyes specifically, this means making the lashes appear naturally full rather than mascara-coated, the brows appear naturally shaped rather than penciled, the skin around the eye appear naturally luminous rather than concealed, and the eye itself appear naturally bright and open rather than liner-defined. The techniques that achieve these effects are different from those used for a defined or dramatic eye look — they are softer, more strategic, and more reliant on skin-like finishes than on pigment and color.
What Makes the No-Makeup Look Fail
The no-makeup eye look fails in two directions. The first is over-application — using too many products, too much pigment, or formulas that create a visibly made-up finish. A heavy concealer line under the eye, a distinctly colored eyeshadow on the lid, or a visible mascara coating that creates clearly coated lashes all break the natural illusion immediately. The second failure mode is under-preparation — skipping the steps that create the polished, healthy quality that distinguishes a deliberate no-makeup look from simply wearing no makeup. Unprepared skin, ungroomed brows, and sparse or unlifted lashes produce a tired rather than natural result. The no-makeup look lives in the precise middle ground between these two failure modes.
Skincare Preparation for the Eye Area
The no-makeup eye look begins with skincare — not makeup. The eye area skin quality is the foundation everything else sits on, and no technique or product can compensate for a poorly prepared eye area in a look where skin must appear naturally flawless.
Eye Area Hydration
Begin with a well-hydrated eye area. Apply a lightweight eye cream or eye serum — one that absorbs fully rather than sitting on the surface — to the orbital bone area and allow it to absorb completely for at least five minutes before applying any makeup. Dehydrated under-eye skin shows texture, fine lines, and shadows more visibly than well-hydrated skin, and in a look where concealer must be applied very lightly or not at all, skin quality does the heavy lifting. For anyone interested in building a long-term eye area skincare routine that genuinely improves the skin beneath the makeup, the guide on caffeine eye care for dark circles and puffiness and the deeper exploration of peptide eye creams for the lash line both cover targeted ingredients that make a measurable difference to eye area skin quality over time.
Color Correction Before Concealer
If dark circles are a significant concern — and they are one of the most common reasons the no-makeup look fails under the eye — a peach or salmon-toned color corrector applied very lightly to the darkest zones before concealer dramatically reduces the amount of concealer needed to achieve a natural, even result. Less concealer means a more skin-like finish, which is exactly what the no-makeup look requires. Apply the corrector with a fingertip using gentle tapping motions, keeping the application thin enough that it blends seamlessly rather than sitting visibly on the skin.
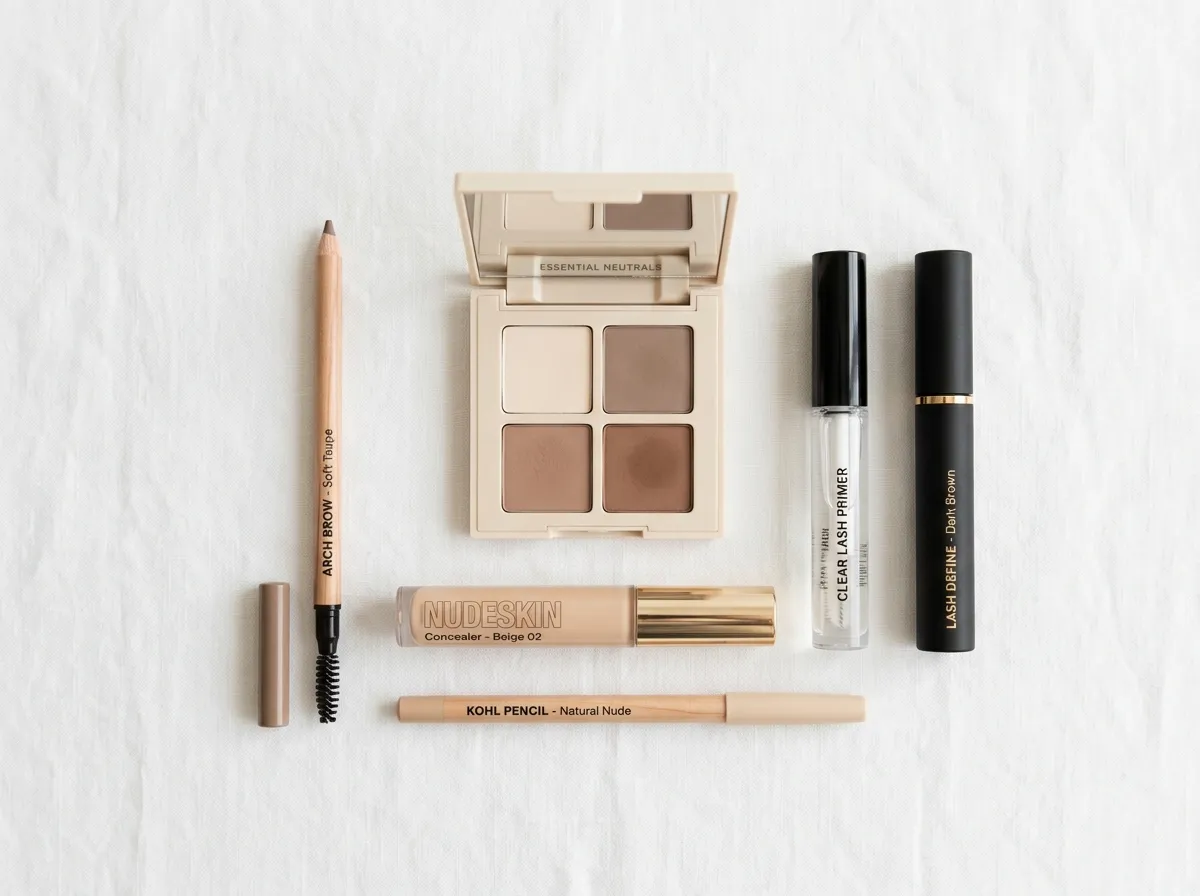
Creating the No-Makeup Eye — Step by Step
The following sequence builds the complete no-makeup eye look from preparation through to the finishing touches. Each step is designed to add a specific quality — brightness, definition, lift, or warmth — without adding any element that reads as visibly applied makeup.
Step 1 — Conceal Selectively, Not Completely
The most important concealer rule for a no-makeup eye look is to apply it selectively rather than blanket-covering the entire under-eye area. Identify the specific darkest zones — typically in the inner corner and along the lower orbital bone — and apply a skin-toned or one shade lighter concealer only to those areas using a small brush or fingertip. Blend the edges thoroughly so the concealer merges with the surrounding skin rather than sitting as a distinct applied layer. Avoid applying concealer all the way up to the lower lash line — this creates a flat, overly matte band under the eye that immediately reads as product rather than skin.
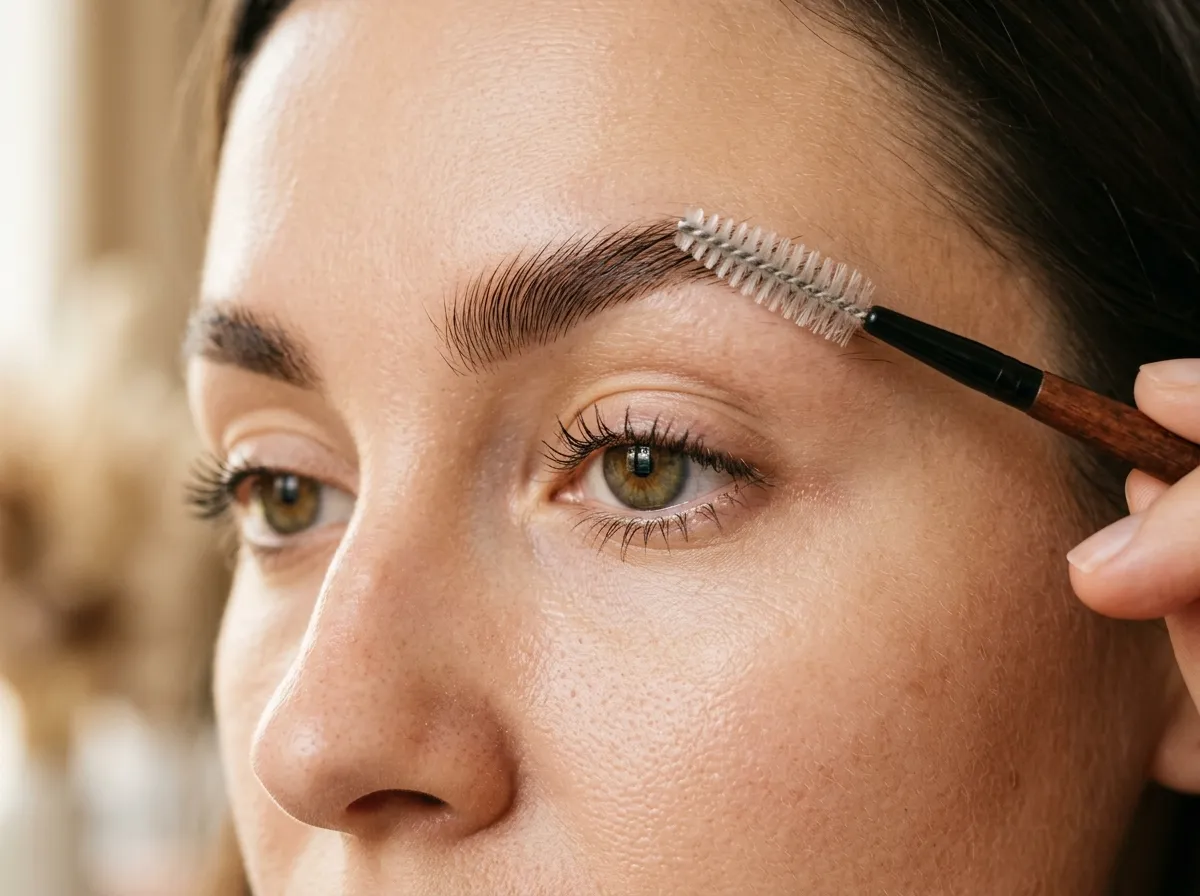
Step 2 — Groom and Softly Define the Brows
Brows are the most important feature in a no-makeup eye look — more impactful than lashes, liner, or any shadow — because well-groomed, naturally defined brows frame the entire eye area and create a polished impression that reads as effortlessly put-together even with minimal eye makeup below them. Brush the brows upward and outward with a clean spoolie to reveal their natural shape. Fill any genuine sparse areas with a fine-tip brow pencil in a shade that matches your natural brow color exactly — not a shade darker, which immediately looks drawn-on — using short, hair-like strokes rather than a continuous line. The goal is to make sparse areas match the density of the fuller zones, not to create a defined brow shape that was not there before.
Step 3 — Apply a Skin-Toned Eyeshadow Base
A matte eyeshadow in a shade that closely matches your skin tone — applied lightly across the entire lid from lash line to brow bone — is one of the most underused tools in the no-makeup makeup approach. It does two things simultaneously: it evens out any discoloration or redness on the lid that would otherwise draw attention to the eye area in an unnatural way, and it creates a slightly matte, smooth surface that gives subsequent products something to adhere to. The result should be invisible — the lid should simply appear to be a clean, even version of itself rather than having any visible shadow on it.
Step 4 — Add Warmth with a Transition Shade
A soft, warm neutral — a light taupe, a warm beige, or a soft brown depending on your skin tone — applied with a fluffy brush to the crease and blended upward and outward creates a subtle depth and dimension in the eye area that mimics the natural shadow that would exist there without any makeup. This step is what separates a no-makeup look that appears genuinely healthy and three-dimensional from one that appears flat and blank. The shade should be only slightly deeper than your skin tone — if it is visibly different from the surrounding skin when you step back from the mirror, it is too deep for this look.
Step 5 — Brighten the Inner Corner and Brow Bone
A small amount of a light, satin or soft shimmer highlight — in a shade one or two tones lighter than your skin — pressed into the inner corner of the eye and lightly onto the brow bone directly below the arch creates the bright, open-eye quality that is the signature of a well-executed no-makeup look. This highlight catches light in the zones where natural light would reflect on a healthy, rested face — the inner corner and the brow bone — and creates the impression of naturally luminous, well-rested eyes. Keep the application precise and light — the highlight should create a subtle glow rather than a distinct sparkle.
Step 6 — Tightline for Definition Without Visible Liner
Tightlining — applying a dark pencil to the inner rim of the upper waterline — is the single most effective technique for adding lash definition to a no-makeup look without any visible liner. Because the product sits within the lash line rather than on top of the skin, it creates the impression that the lashes are simply naturally dense and dark at the root rather than that any liner has been applied. Use a very dark brown rather than true black for a softer, more natural result — true black tightlining on a no-makeup look can sometimes read as too defined depending on skin tone and natural lash color. The complete guide to tightlining your waterline for bigger-looking eyes covers the full technique in detail — it is the most impactful single technique in a no-makeup eye routine and worth mastering thoroughly.
Step 7 — Apply a Brightening Nude Liner to the Lower Waterline
A nude or white pencil liner applied to the lower waterline — the inner rim of the lower lid — instantly makes the white of the eye appear larger and brighter. On a no-makeup look, this is the technique that creates the wide-awake, naturally bright eye quality that is impossible to achieve with skincare or color correction alone. The liner sits invisibly within the waterline and appears to extend the visible white of the eye downward — making eyes appear more open, more rested, and more vivid without any visible product. Use a waterproof formula to prevent migration throughout the day.
Step 8 — Curl Lashes Thoroughly
A lash curler is non-negotiable in the no-makeup eye look. Curled lashes open the eye dramatically and create a lifted, awake quality that reads as entirely natural — nobody looks at a curled lash and thinks makeup, they think healthy and bright. Use the three-position curling technique — base, mid-shaft, and tips — for a gradual, natural-looking curl that holds throughout the day. On a no-makeup look, well-curled natural lashes with minimal mascara will always look more authentically natural than straight or uncurled lashes with multiple mascara coats trying to compensate for the lack of lift.
Step 9 — Apply Mascara with a Light Hand
Mascara on a no-makeup look requires deliberate restraint. The goal is lashes that appear naturally full and defined — not coated, not volumized beyond what appears naturally possible, and not darkened to a degree that reads as obviously applied. Apply one coat of a lengthening or defining mascara — not a volumizing formula — using a light hand that coats without clumping. Focus the application at the root where it adds the most definition and draws less attention than a heavy tip coating. A brown mascara rather than black often reads as more naturally lash-like on fair to medium skin tones — the softer contrast mimics the natural variation in lash color rather than creating a uniform, ink-black coating. The full breakdown of brown mascara vs. black mascara covers exactly which shade suits which complexion for the most natural result.
The No-Makeup Look with Lash Extensions
Lash extensions and the no-makeup makeup eye look are a natural pairing — extensions provide the lash fullness and definition that the look requires without any mascara application at all, leaving the eye area completely free of product and the overall result genuinely minimal while still appearing polished and defined.
Choosing the Right Extension Style
For the no-makeup aesthetic specifically, the most appropriate extension styles are those that enhance rather than dramatically transform the natural lash. A classic set in natural lengths — one to two millimetres beyond the natural lash — or a light hybrid set with a natural mapping creates the full, defined lash look the aesthetic calls for without the dramatic volume or length that would read as obviously enhanced. The guide on angel lashes vs. fox eye for a natural aesthetic covers the extension styles that work best for women who want a genuinely natural-looking lash result — directly relevant to building an extension look that complements a no-makeup eye approach.
Minimal Eye Makeup Over Extensions
When wearing extensions as part of a no-makeup look, the eye makeup routine simplifies dramatically. Skip mascara entirely. Apply tightlining to fill any gaps at the root that might be visible between extensions. Add a nude lower waterline liner to brighten the eye. Apply the skin-toned lid shadow and the soft transition shade for dimension. The brow grooming and concealing steps remain the same. The result — extensions providing lash definition and the minimal eye makeup steps providing skin quality and brightness — is one of the most genuinely effortless and convincing no-makeup looks achievable.
Common No-Makeup Look Mistakes to Avoid
The no-makeup makeup look is simultaneously one of the most forgiving and one of the most precise aesthetics in beauty. A few persistent mistakes consistently undermine even the most carefully executed attempt.
Using the Wrong Concealer Shade
A concealer that is significantly lighter than the surrounding skin — applied with the intention of brightening the under-eye — creates the exact opposite of a natural result. A bright, light patch under the eye reads immediately as product and draws attention to the area rather than making it disappear. Match your concealer to your skin tone exactly, or go only one shade lighter, and blend thoroughly to ensure there is no visible boundary between the concealed and uncovered skin.
Skipping Brow Grooming
Ungoverned brows on a no-makeup look make the entire face appear unfinished rather than naturally effortless. Even two minutes of brushing the brows into shape and filling any genuinely sparse areas makes a visible difference to the cohesiveness of the look. Brow grooming is the step that most consistently separates a deliberate no-makeup look from simply wearing no makeup.
Over-Applying the Highlight
A glittery, intensely shimmery highlight at the inner corner immediately reads as a product choice rather than natural luminosity. Keep inner corner highlights very soft — a satin or pearl finish rather than a glitter or foiled one — and apply with a fingertip rather than a brush for a sheered, skin-like quality rather than a distinct sparkle deposit.
The No-Makeup Look Is a Skill Worth Developing
The no-makeup makeup eye look rewards consistent practice more than almost any other beauty aesthetic — because it requires an understanding of your own specific features, skin tone, and natural lash and brow characteristics that only develops through working with them deliberately over time. Once you understand which shade of transition shadow looks genuinely natural on your specific skin, which mascara coat count reads as naturally full rather than coated, and which concealer placement creates brightness without visibility — the routine becomes quick, intuitive, and reliably beautiful.
For anyone who wants to explore the full spectrum of natural and minimal eye looks — including how lash lifts and tints can replace extensions as part of a low-maintenance natural aesthetic — the guide on lash lifts and tints as a low-maintenance alternative covers how a lifted, tinted natural lash can provide all the definition the no-makeup look needs without any mascara, extensions, or ongoing lash maintenance. For further editorial guidance on the no-makeup makeup look from professional makeup artists across all skin tones and feature types, the Byrdie guide to the no-makeup makeup look is one of the most comprehensive and regularly updated references available.