Blush has had many eras in beauty history — the sculpted contour blush of the early 2010s, the NARS Orgasm-on-the-apples flush of the 2000s, the barely-there no-blush minimalism of recent years. But the blush placement that is dominating 2026 runways, editorial spreads, and beauty feeds is something genuinely different from all of them. Blush draping takes the color well above the traditional cheekbone zone, sweeping it up toward the temples, around the outer eye area, and sometimes across the nose in a way that frames the entire upper face rather than simply adding color to the cheeks.
The result is a face that looks lifted, sculpted, and luminously healthy — as though you have just returned from a warm holiday or spent a morning in beautiful natural light. It is one of the most flattering techniques in 2026’s beauty toolkit, and it requires no contouring, no complex brushwork, and no special products beyond the blush you likely already own. This guide teaches you exactly how to do it and how to adapt it for your specific face shape and skin tone.
What Is Blush Draping and Why Is It Different
Traditional blush application follows a fairly predictable formula — smile, find the apples of the cheeks, sweep the color in a C-shape up toward the temple, stop before reaching the eye. The goal is a defined flush of color in a contained zone. Blush draping breaks this formula entirely by intentionally placing the blush higher, wider, and closer to the eye than conventional guidance has ever suggested.
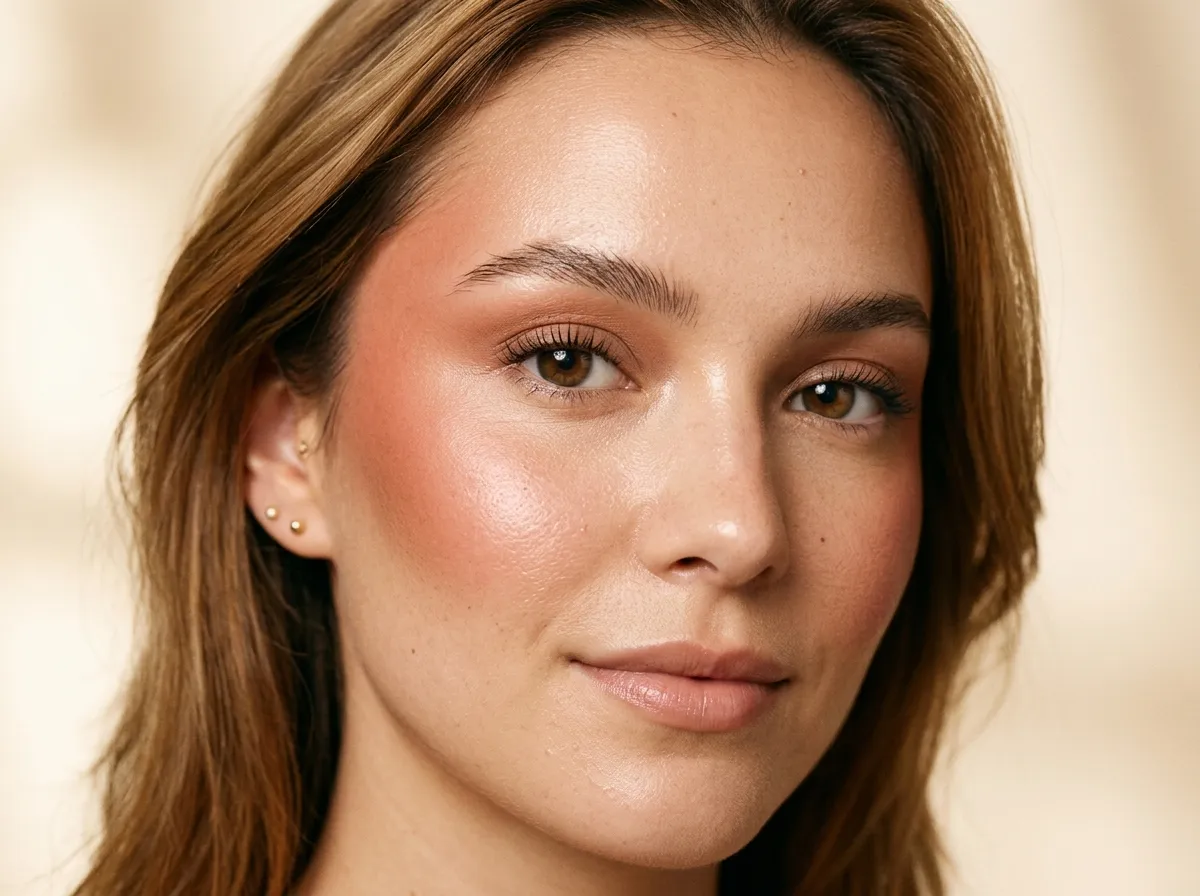
In a draped blush application, the color begins at the highest point of the cheekbone — sometimes even slightly below the outer corner of the eye — and sweeps upward and outward toward the temple, then continues in a soft arc that wraps around the outer eye area. Some interpretations of blush draping also extend a soft wash of the same color across the bridge of the nose and under the lower lash line for a fully immersive sun-kissed effect.
Why It Creates a Lifting Effect
The lifting quality of blush draping is not an accident — it is the direct result of where the color is placed. When blush sits on the apples of the cheeks in the traditional position, it draws the eye to the center of the face horizontally. When it is placed high on the cheekbone and swept upward toward the temple, the eye follows the direction of the color application — upward and outward — which creates a visual lifting and elongating effect on the entire upper face. The outer eye area appears more open, the cheekbones appear more prominent, and the face as a whole reads as more sculpted and awake without a single drop of contour or highlight.
The Connection to Lash and Eye Framing
For anyone who invests in their eye look — whether through lash extensions, lifts, careful mascara application, or eye makeup — blush draping is one of the most synergistic face makeup techniques available. By placing color around and below the outer eye, it creates a warm, glowing frame that makes the eye area — and any lash work you have done — appear more prominent and intentionally styled. The blush essentially becomes part of the eye look rather than a separate cheek product, unifying the face in a way that isolated cheek blush never quite achieves. Understanding how to choose lash and eye styles that complement your face shape deepens this synergy further — the guide on choosing the best lash extension style for your eye shape covers how to approach the full eye area as a cohesive unit.
Choosing the Right Products for Blush Draping
Because blush draping involves placing color in zones where blush does not traditionally go — particularly close to the eye and across the nose — product texture and formula play a larger role in the success of this technique than they do in standard cheek application.
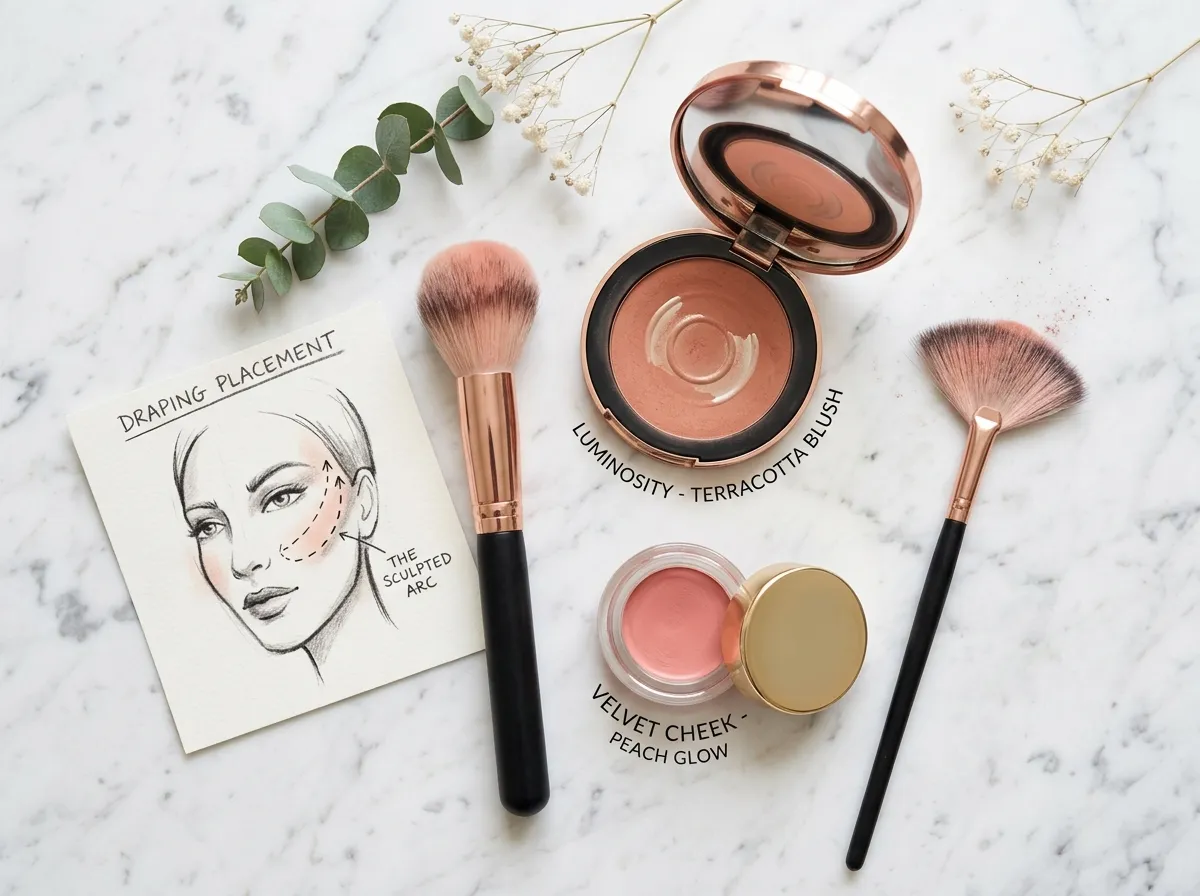
Powder Blush
A finely milled powder blush is the most beginner-friendly format for draping because it is the most forgiving — mistakes can be blended out or corrected more easily than with cream or liquid formulas, and the dry finish is less likely to interfere with any eye makeup or lash products in the areas it overlaps. Look for a powder blush with a soft, buildable pigmentation rather than a highly saturated, dense formula — the draping technique works best when the color is applied in multiple light layers rather than deposited heavily in a single pass.
Cream Blush
A cream blush applied with the fingertips creates a more skin-like, luminous result that suits the dewy, healthy aesthetic that blush draping is most commonly paired with. Cream formulas blend seamlessly into the skin and create a natural flush that looks genuinely like internal warmth rather than applied product — which is the entire spirit of the draped blush look. The trade-off is that cream blush requires more careful blending near the eye area to avoid transfer onto any eye makeup or extension adhesive bonds. If you wear lash extensions, apply your cream blush before any eye makeup and keep the outer edge of the application slightly further from the lash line than you might with powder.
Blush Shades That Work Best
The draped blush technique works across the full spectrum of blush shades, but the most flattering results tend to come from warm, sun-kissed tones rather than cool or neon pinks. Peach, apricot, terracotta, warm coral, soft brick, and warm rose all create the natural, healthy-flush quality that draping is designed to emulate. Cooler pink and berry tones can work beautifully on fairer skin tones but require a lighter hand near the eye area to avoid reading as bruised or unwell rather than glowing. For deeper skin tones, rich brick red, warm cinnamon, and deep terracotta shades create a stunning draped result that reads as genuinely sun-kissed rather than overly made-up.
How to Apply Blush Draping Step by Step
The following technique is designed for a powder blush applied with a brush — the most accessible starting point for anyone new to draping. Once you are comfortable with the placement and blending, transitioning to a cream formula or experimenting with more extended placements becomes significantly easier.
Step 1 — Identify Your Starting Point
Stand in front of a well-lit mirror and look straight ahead with a relaxed expression. Identify the highest point of your cheekbone — the small, prominent ridge of bone that sits directly below the outer corner of your eye. This is where your blush draping begins. Unlike traditional blush application, which starts at the apple of the cheek well below the eye, draped blush starts at this high cheekbone point and moves upward and outward from there rather than downward toward the apple.
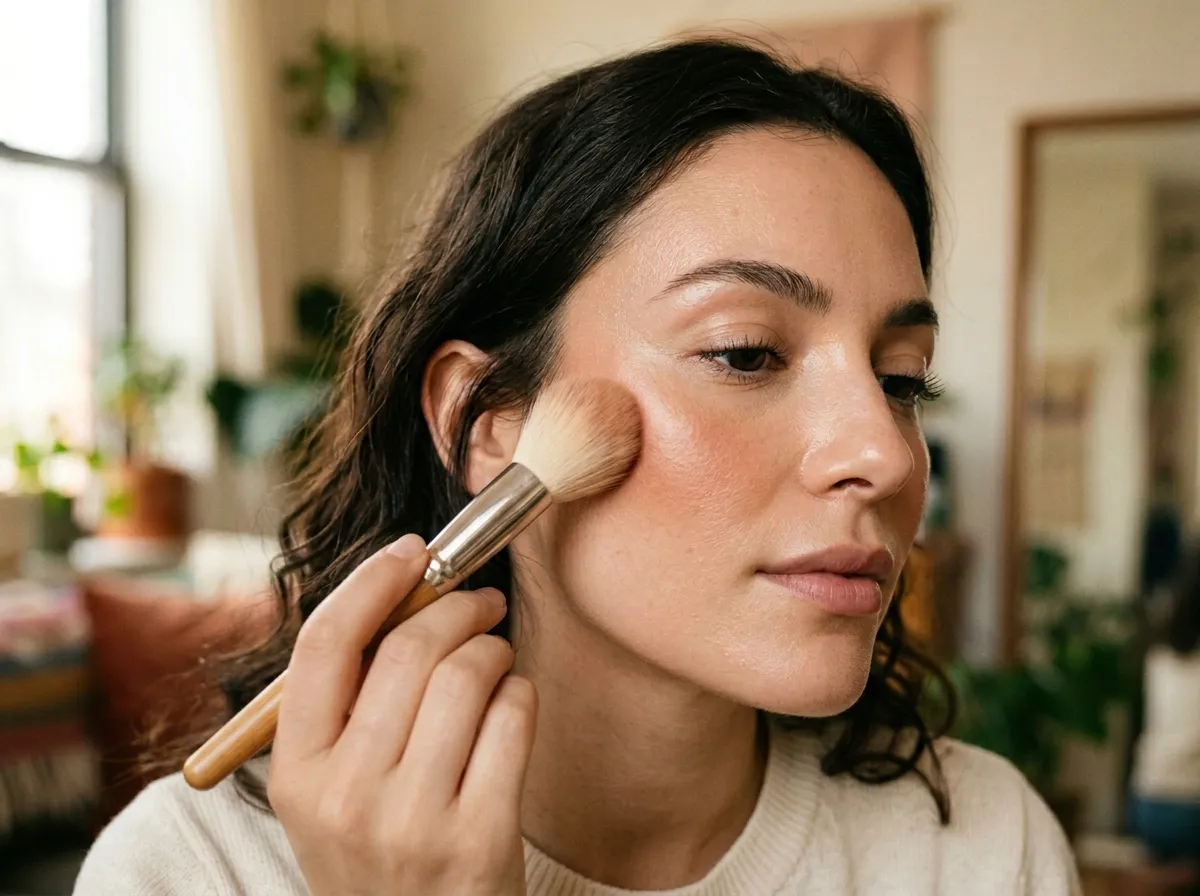
Step 2 — Load and Tap Your Brush
Use a medium-sized fluffy blush brush — a brush with a rounded, dome-shaped head and loosely packed bristles that allows for soft, diffused application rather than a concentrated deposit of color. Load the brush lightly by swirling it into the powder, then tap the back of the brush firmly against your hand two or three times to release any excess product. Starting with less product than you think you need is critical with draping — the high placement near the eye means any excess is immediately very visible, and it is always easier to add more than to remove too much.
Step 3 — Apply the First Sweep Along the Cheekbone
Place the brush at the high cheekbone point below the outer eye corner and sweep it upward and outward toward the temple in one fluid motion. Repeat this sweep two or three times, allowing the color to build gradually. The brush should be moving upward and diagonally toward the hairline — not horizontally across the cheek in the traditional direction. This upward sweep is what creates the lifting directional quality that defines the technique.
Step 4 — Wrap Around the Outer Eye
This is the step that most distinctly separates draping from conventional blush application. Using a light hand and a barely loaded brush, continue the color arc from the temple around the outer corner of the eye — placing a soft, diffused wash of blush slightly above and beside the outer lash line. The color here should be significantly lighter than at the cheekbone — you are creating a faint halo of warmth around the outer eye rather than depositing a concentrated flush. Use circular, dabbing motions rather than sweeping strokes in this delicate zone to maintain control over the placement.
Step 5 — Blend Downward into the Cheek
Using a clean section of your brush or a separate, clean, fluffy brush, blend the lower edge of the draped blush downward into the upper cheek to prevent any hard lines where the product stops. The draped blush should fade organically into the skin below — with the highest color concentration at the cheekbone and outer eye area and a natural gradient down toward the lower cheek. If the transition looks abrupt, a light circular blending motion over the boundary with a clean brush will dissolve it seamlessly.
Step 6 — Optional Nose Bridge Extension
For the full sun-kissed draping effect seen on 2026 runways, dust a very small amount of the same blush lightly across the bridge of the nose using a fan brush or the very tip of your blush brush. This step should be extremely subtle — barely-there color that suggests sun exposure rather than a deliberate product application. Less is significantly more here. This nose bridge addition ties the draped cheek color to the center of the face and creates the cohesive, all-over warmth that makes the full draping technique look genuinely like a natural flush rather than applied blush.
Blush Draping for Every Face Shape
While the foundational technique above works for most face shapes, small adjustments to the angle, length, and depth of the drape create results that are more specifically flattering for different face shapes.
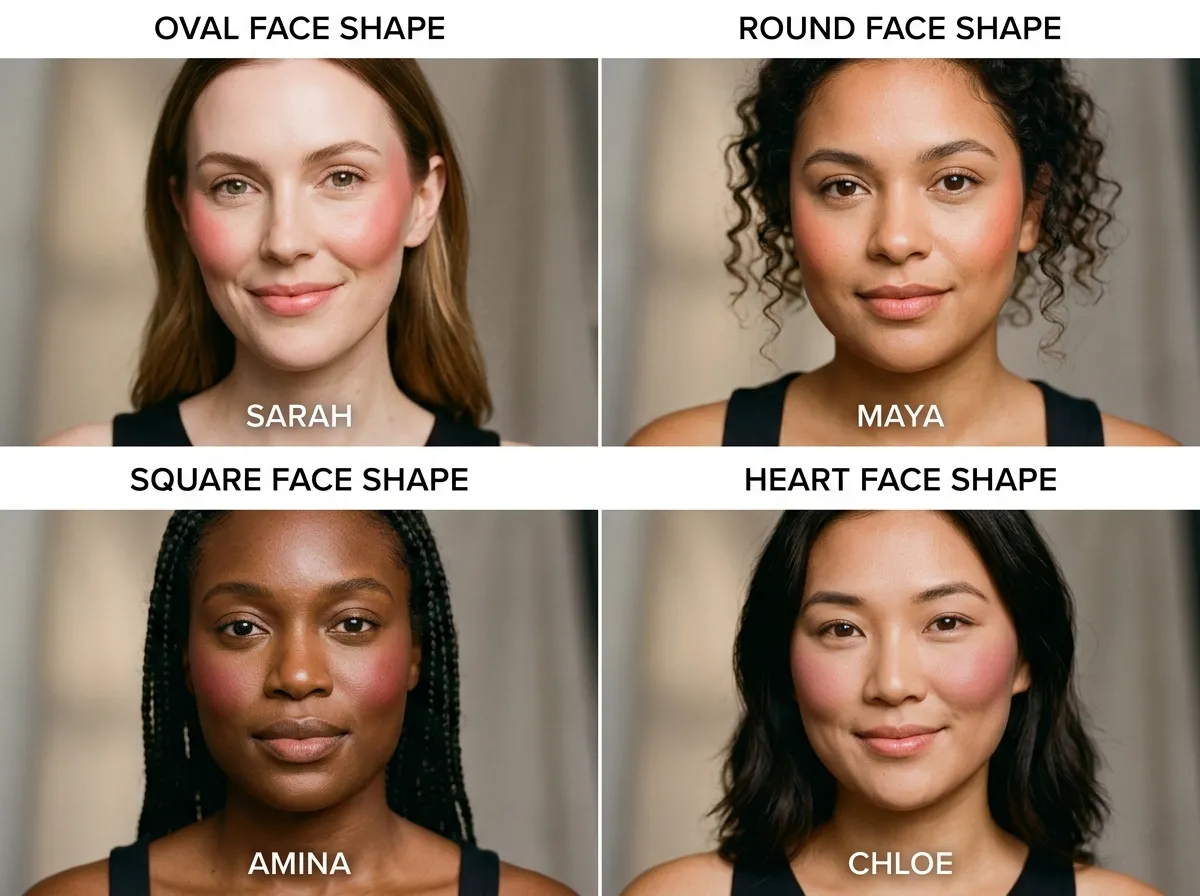
Oval Face Shape
Oval faces are the most versatile for blush draping — the naturally balanced proportions allow for almost any draping angle and placement. A classic upward sweep from the high cheekbone through the temple with a moderate outer eye wrap works beautifully without any specific adjustments. Focus the deepest color concentration at the cheekbone and keep the outer eye wrap soft and diffused for the most universally flattering result.
Round Face Shape
For round faces, the goal of blush draping is elongation — pulling the visual emphasis upward and outward to counterbalance the natural horizontal width of the face. Use a more steeply angled sweep — closer to vertical than diagonal — and extend the temple placement higher up toward the hairline. Keep the nose bridge extension minimal or skip it entirely, as additional color at the center of the face will emphasize width rather than length.
Square Face Shape
Square faces benefit from a draping placement that softens the angular quality of the jawline and brow while lifting the center of the face. Use a gentle diagonal sweep from cheekbone to temple and wrap the outer eye color softly — avoid any placement that sits too close to the jaw or lower cheek, which can emphasize squareness. A subtle nose bridge addition helps draw the eye upward and inward, reducing the appearance of a strong jaw.
Heart Face Shape
Heart faces — wider at the forehead and narrower at the jaw — benefit from a draped blush that adds warmth to the mid-face without emphasizing the already wide upper face. Keep the temple placement modest and concentrate the deepest color at the cheekbone rather than extending aggressively toward the hairline. A soft outer eye wrap that stays close to the cheekbone creates the lifted quality without adding horizontal width at the temple zone.
Long Face Shape
For long faces, the goal is to add horizontal width and visual weight to the mid-face. Apply draped blush with a more horizontal sweep than the standard diagonal — moving from inner cheekbone outward across the face rather than upward toward the temple. Keep the placement lower and wider to create horizontal emphasis. Skip the outer eye wrap or keep it very minimal, as the upward pull of the wrap can further elongate an already long face shape.
Common Blush Draping Mistakes and How to Fix Them
Because blush draping involves placing color in unfamiliar zones, a few specific mistakes come up consistently for first-time practitioners. Knowing them in advance saves significant product and frustration.
Too Much Color Near the Eye
The most common draping mistake is applying too much product in the outer eye wrap zone, which can make the area look bruised or overly made-up rather than sun-kissed and glowing. Always use a barely loaded brush for the eye area portion of the drape — the color there should be almost imperceptible as a standalone element and only visible as warmth when the full face is viewed together. If you have applied too much, a clean brush blended lightly over the area will diffuse the color without removing it entirely.
A Visible Stop Line at the Edge of the Blush
A hard edge where the blush stops is a blending issue — the product has been deposited without being adequately diffused at its boundary. Always finish any blush application by running a clean, dry fluffy brush over the perimeter of the color using light circular motions. This diffusion step — sometimes called a halo blend — dissolves any visible edges and integrates the blush seamlessly into the surrounding skin.
The Color Looks Too Intense Under Certain Lighting
Blush draping can occasionally look more intense under certain lighting conditions — particularly direct overhead lighting — than it appeared in your bathroom mirror. The solution is to apply your draped blush in the lighting conditions closest to where you will be wearing it, or to deliberately apply slightly less product than feels necessary indoors, knowing that the look will be adequate in brighter, more directional light. Building the color up in layers rather than applying it in a single pass gives you significantly more control over the final intensity.
Blush Draping Works With Your Whole Eye Look
The real power of blush draping is not just in how it looks in isolation — it is in how it works with everything else on your face. When your blush is sweeping up toward the temple and around the outer eye, it integrates with your eye makeup, your lash look, and your skin in a way that creates a genuinely cohesive result. The eye, the cheek, and the skin all appear to be working together as a unified aesthetic rather than separate products applied independently.
For anyone wearing lash extensions or a lash lift, draped blush is one of the best face makeup techniques to pair with your lash look — the warmth it creates around the eye frames the lashes from a different angle and creates the kind of natural, radiant polish that makes a full lash set look even more beautiful. The guide on lash lifts and tints as a low-maintenance alternative covers how a lifted lash looks paired with minimal face makeup — and draped blush is exactly the kind of soft, enhancing technique that complements a lifted lash perfectly without overpowering it.
For a broader look at how 2026’s most significant makeup trends — including blush draping — are being interpreted across skill levels and skin tones, the New Beauty guide to blush draping offers authoritative editorial coverage from professional makeup artists that pairs well with the step-by-step technique covered here. And if you want to build out the full eye look to pair with your draped blush, the complete smoky eye guide for beginners covers exactly how to layer and blend eyeshadow in a way that complements rather than competes with a high-placed, draped blush application.