
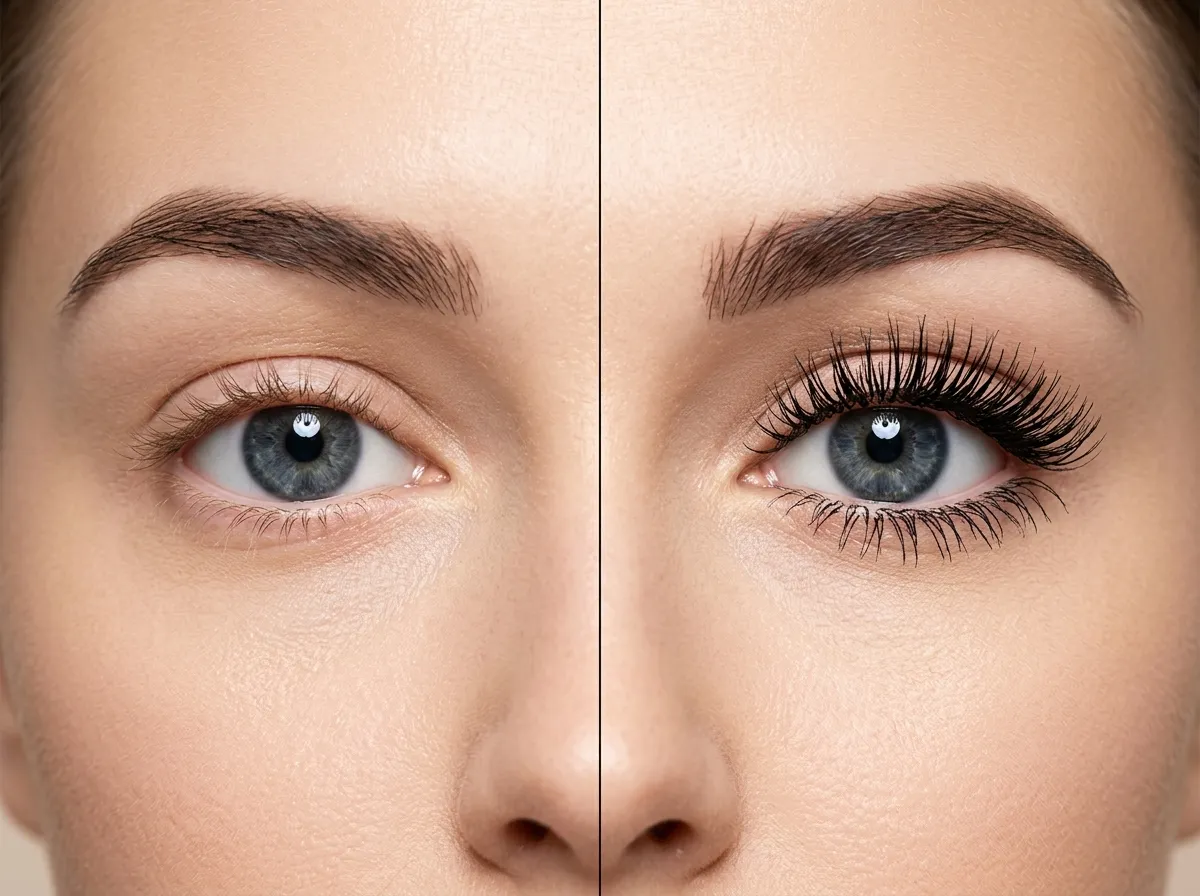
Lash extensions are wonderful — but they are not always practical. Between the cost, the appointment schedule, the aftercare routine, and the fill commitments, there are plenty of moments when you simply want dramatic, full lashes without the investment or the maintenance. And while most mascara tutorials focus on a single coat applied in a hurry, the real secret to mascara that genuinely rivals the look of extensions is layering — building volume, length, and definition through a deliberate, sequenced application process that most women have never been shown.
The layered mascara technique is not complicated. It does not require an enormous collection of products or any special skills. What it requires is understanding which formulas to layer and in which order, how long to wait between coats, and a few application tricks that professional makeup artists use on set to create lash looks that photograph as dramatically as extensions. This guide covers all of it.
Why Layering Works Better Than a Single Formula
The reason most women do not get dramatic results from mascara is that they apply one formula in one or two coats and expect it to deliver everything — volume, length, definition, and hold — simultaneously. No single mascara formula excels at all of these qualities at once. Formulas designed for maximum volume tend to be thick and coating, which can reduce the appearance of length. Formulas designed for length tend to be thinner and more separating, which can limit fullness. Formulas designed for curl hold tend to prioritize staying power over pigment density.
Layering works because it allows each formula to do the specific job it is designed for, in sequence, so the combined result delivers what no single product could achieve alone. Think of it the way a professional painter approaches a wall — primer first for adhesion, base coat for coverage, top coat for finish. Each layer serves a distinct purpose and enhances the layer applied after it.
The Three-Layer Approach
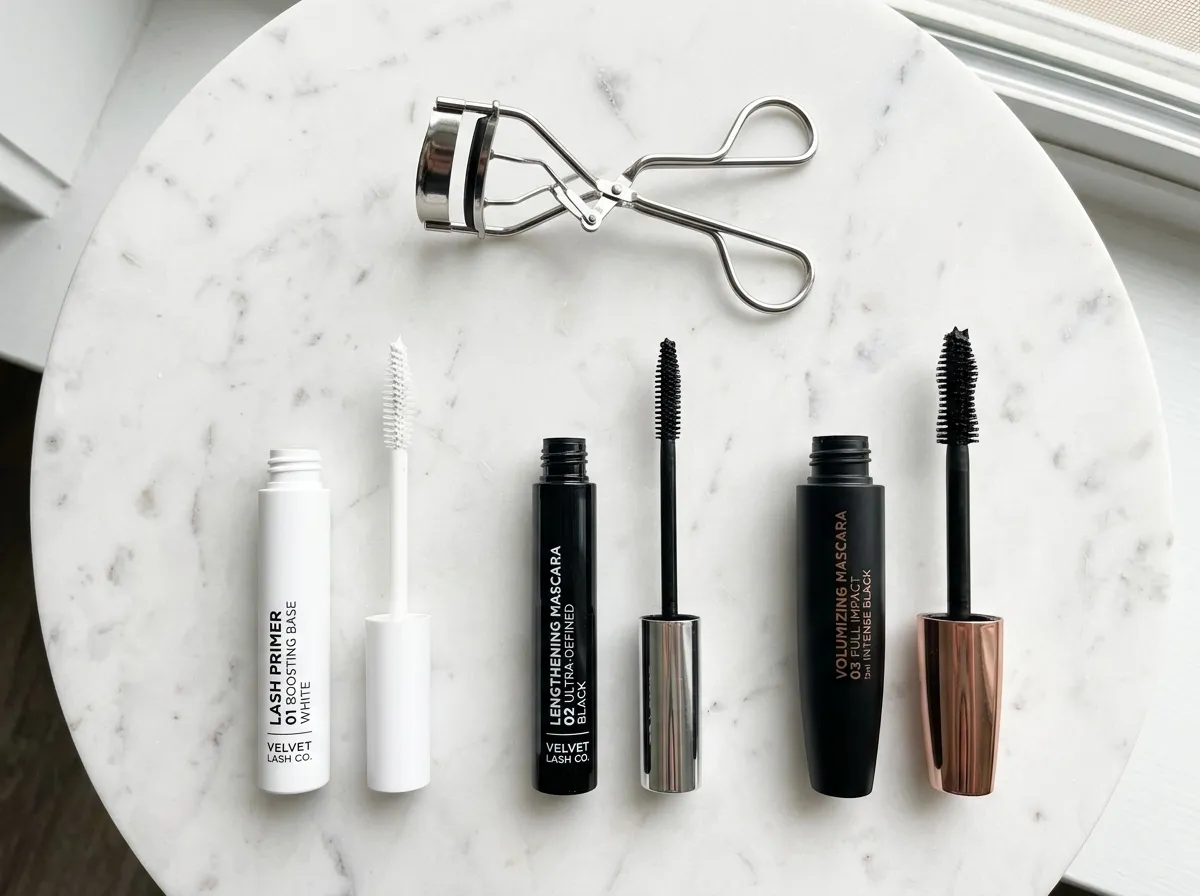
The most effective layered mascara technique uses three distinct formula types applied in a specific sequence. You do not need three separate mascaras from three separate brands — many two-mascara combinations plus a lash primer will achieve the same result. The three layers are: lash primer as the foundation, a lengthening or separating mascara as the base coat, and a volumizing mascara as the top coat. Each layer is applied with a brief drying interval between them to prevent clumping and ensure each coat sets properly before the next is added.
What You Need Before You Start
Getting the product selection right before you begin is what separates a layered mascara look that appears full and dimensional from one that simply looks clumped and heavy. The goal is controlled build — each layer adding to the last without the lashes sticking together or losing their individual separation.
Lash Primer
A lash primer is a white or translucent base coat applied to the lashes before any mascara. It coats each lash with a conditioning, slightly grippy formula that gives the subsequent mascara layers more surface area to adhere to — essentially thickening the lash shaft before any color is applied. Primer also conditions the natural lash, which is a genuine benefit for anyone who wears mascara regularly. If you have never used a lash primer and your mascara results have always felt underwhelming, adding this single step will likely produce the biggest single improvement to your results of anything in this guide.
Lengthening Mascara
Applied over primer, a lengthening mascara uses a thinner, more fluid formula and a comb-style wand to extend the appearance of each lash and create clean separation between them. This layer creates the base structure of the false lash effect — individual lashes that appear long, distinct, and precisely fanned rather than clumped together. Look for formulas described as lengthening, defining, or separating. Fiber mascaras — which contain tiny fibers that adhere to the lash tips and extend their apparent length — fall into this category and are particularly effective as a base layer when building toward a dramatic result.
Volumizing Mascara
The volumizing mascara is applied last and uses a thicker, more coating formula with a densely bristled wand to build fullness over the length and separation created by the previous layers. This is the layer that creates the impression of density — the quality that most distinguishes a dramatic lash look from an everyday one. Applied correctly over a dried lengthening base, a volumizing mascara adds the coat that makes lashes appear to have twice the natural density without clumping the individual lash separation achieved in the previous step.
Lash Curler
A lash curler used before any product is applied is not technically part of the layering sequence — but it is the non-negotiable preparation step that determines whether the entire technique works or falls flat. Curled lashes open the eye dramatically, create the lifted effect that makes lashes appear longer than they are, and provide the upward direction that allows each mascara layer to build in the right orientation. Always curl before mascara — curling after will break the formula and can pull out lashes. For anyone whose natural lashes are particularly resistant to holding a curl, warming the curler slightly with a hairdryer for a few seconds before use — testing the temperature on your wrist first — significantly improves curl retention throughout the day.
The Step-by-Step Layering Technique
Work through these steps in sequence. The timing between layers is as important as the products themselves — rushing the drying intervals between coats is the primary cause of clumping when layering multiple formulas.
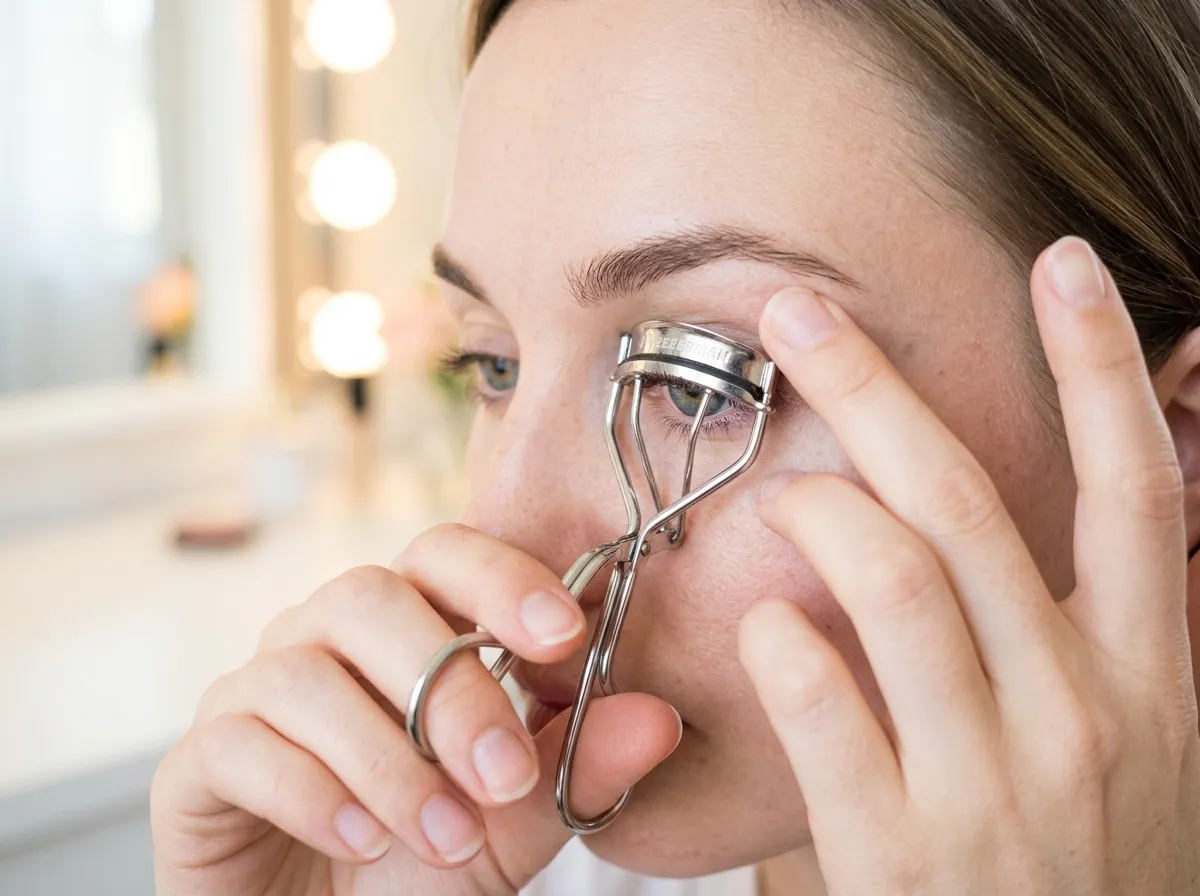
Step 1 — Curl Your Lashes
Position your lash curler at the base of the upper lashes — as close to the lash root as possible without pinching the skin of the lid. Close the curler firmly and hold for ten seconds, then release. Move the curler to the mid-shaft of the lash and hold for another five seconds, then move to the tips for a final five seconds. This three-position technique creates a more gradual, natural-looking curve rather than a single sharp bend at the base. Repeat on the other eye before moving to the next step.
Step 2 — Apply Lash Primer
Using the primer wand, apply a coat of lash primer from the root to the tip of the upper lashes using a zigzag motion — wiggling the wand slightly from side to side as you move upward to coat each lash on all sides rather than just the top surface. Allow the primer to dry for sixty full seconds before the next step. This drying interval is critical — wet primer will dilute the first mascara coat and prevent it from building correctly. The primer will appear white on the lashes and may look slightly clumpy at this stage — that is completely normal and will be blended away by the mascara layers that follow.
Step 3 — Apply Your Lengthening Mascara
Starting at the base of the upper lashes, place the lengthening mascara wand horizontally at the lash root and wiggle it gently from side to side before drawing it upward through the lashes to the tips in one fluid motion. The wiggle at the root is important — it deposits extra product at the base where lashes are thickest and ensures full root-to-tip coverage in a single pass. Apply one coat to all upper lashes, then allow to dry for thirty to forty-five seconds before adding the second coat.
Apply a second coat of the lengthening mascara using the same technique, focusing on the outer lashes to fan them outward and create the wide, open-eye effect that mimics the spread of a false lash band. If your lengthening mascara is a fiber formula, the second coat will deposit additional fibers onto the tips — extending the apparent length further with each layer.
Step 4 — Apply Your Volumizing Mascara
Allow the lengthening coats to dry for a full sixty seconds before switching to your volumizing mascara. This is the most important drying interval in the sequence — the volumizing formula is thicker and heavier than the lengthening base, and applying it over wet lengthening mascara will collapse the separation you just built and produce clumps.
Apply the volumizing mascara using a rolling motion — pressing the wand into the base of the lashes and rolling it upward rather than simply dragging it through. This rolling motion deposits maximum product at the root and creates the dense, full base that generates the impression of significantly thicker lashes. Apply one generous coat to all upper lashes, focusing on building density at the root rather than extending toward the tips. For most people, one coat of volumizing mascara over two coats of lengthening is sufficient — a second volumizing coat is optional and best reserved for the outer third of the lashes only, where additional density creates the most dramatic effect.
Step 5 — Separate Any Clumps
Before the volumizing coat sets fully — within the first thirty seconds after application — use a clean metal or plastic lash comb to separate any lashes that have stuck together during the layering process. Work from root to tip in smooth strokes, focusing on any areas where the lash density is highest. A clean spoolie brush used with a light touch achieves the same result if you do not have a dedicated lash comb. This separation step restores the individual lash definition established in the lengthening layer while maintaining the volume added by the final coat.
Step 6 — Apply to Lower Lashes (Optional)
For a complete false-lash effect, applying mascara to the lower lashes ties the full eye look together. Hold the wand vertically and use the tip to apply product to the lower lashes with small side-to-side strokes — this technique gives more control over a smaller lash area and prevents the mascara from transferring onto the skin beneath the eye. A single coat of your lengthening formula is usually sufficient on the lower lashes — the volumizing formula tends to be too heavy for the finer lower lashes and can cause smudging.
Products That Work Especially Well When Layered
Knowing what types of formulas to combine is helpful, but understanding a few specific product characteristics that make layering more effective will help you choose well from whatever is available to you.
What to Look for in a Lengthening Base
For the base layer, prioritize a formula with a thin, fluid consistency and a wand with widely spaced bristles or a fine comb. Thin formulas dry faster between layers and create cleaner separation between individual lashes. Fiber mascaras are particularly effective here — the synthetic fibers they deposit extend the apparent lash length beyond what pigment alone can achieve and give the volumizing top coat more surface area to adhere to.
What to Look for in a Volumizing Top Coat
For the top coat, look for a formula described as thickening, volumizing, or mega volume with a dense, fluffy wand that has tightly packed bristles. The bristle density determines how much product is deposited with each stroke — denser bristles load more formula and build volume faster. Avoid very wet or goopy volumizing formulas as a top coat over lengthening mascara, as the excess moisture will reactivate the lower layers and cause clumping regardless of how long you waited between coats.
For a comprehensive guide to tubing mascaras — one of the best formula types for building layered looks without smudging or flaking throughout the day — the detailed breakdown of the best tubing mascaras for 2026 covers the specific formulas that hold up best under multiple coats. For expert editorial testing and up-to-date product rankings across both lengthening and volumizing categories, Allure’s best mascara guide is one of the most rigorously tested references available.
Making the Look Last All Day
A layered mascara look requires a little extra attention to longevity compared to a single-coat application, simply because more product has been applied and more surface area is involved. A few targeted steps at the end of your application will significantly extend how long the look holds its shape and intensity.
Set with a Translucent Powder
Lightly dusting a translucent setting powder over the under-eye area — not on the lashes themselves, but on the skin directly beneath them — creates a barrier that catches any mascara transfer throughout the day before it can reach your foundation or concealer. This is a professional makeup artist trick used on any shoot or event where smudging under the eye is a concern.
Use Waterproof Formula for the Final Coat
If longevity in warm, humid, or active conditions is a priority, using a waterproof volumizing mascara as your final top coat locks the layered look in place far more effectively than a regular formula. The waterproof polymer in the top coat seals all the layers beneath it and prevents them from migrating or smudging even in challenging conditions. This is particularly useful for anyone in a tropical or humid climate where regular mascara tends to slide within hours — the broader guide on managing lash retention in humid climates covers how environmental factors affect all lash products, not just extensions, and is worth reading alongside this technique for a complete picture.
Avoid Touching or Rubbing Your Eyes
This applies to all mascara but becomes more important with a layered application. The more product that has been applied, the more susceptible the lashes are to smudging from touch or friction. Blot rather than rub if your eyes need attention throughout the day, and use a clean cotton swab for any touch-up corrections rather than your finger.
The Gap Between Mascara and Extensions Is Smaller Than You Think
The right layered mascara technique applied with the right products and a little practice produces a result that will genuinely surprise you. The gap between a well-executed layered mascara look and a fresh set of extensions is far smaller than most people assume — and on days when extensions are not practical, not affordable, or simply not what you want to commit to, layered mascara is not a compromise. It is a genuinely beautiful alternative in its own right.
For the complete picture of how mascara fits into your broader lash routine — whether you wear extensions, lash lifts, or natural lashes — the guide on how to properly apply mascara and eye makeup covers the foundational application principles that work alongside the layering technique covered here. And for the definitive comparison of which mascara shades work best for different looks and colorings, the breakdown of brown mascara vs. black mascara will help you choose the right shade to finish your layered look for maximum impact.