
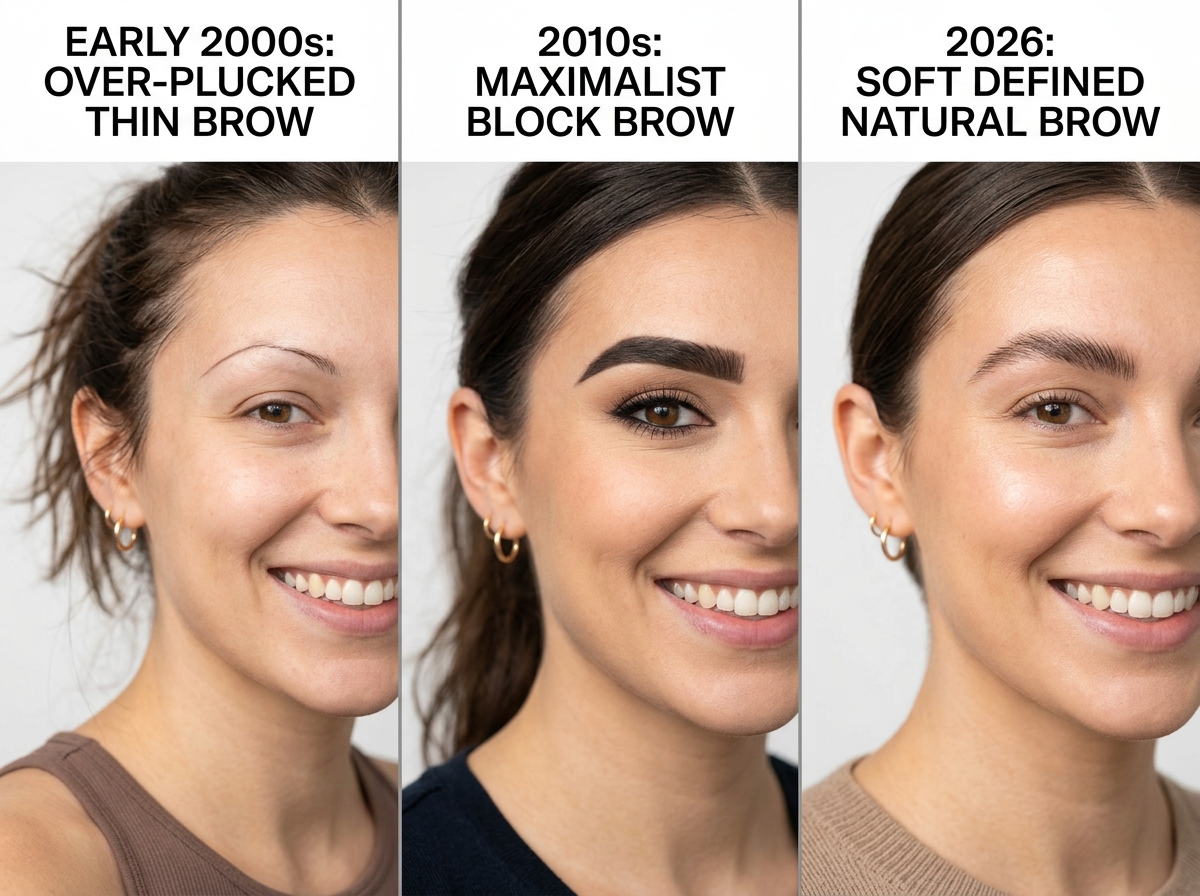
The brow landscape of 2026 looks nothing like it did five years ago — and it looks nothing like the laminated, heavily filled, soap-brow maximalism that dominated for the years immediately preceding this one either. The dominant brow aesthetic of 2026 is what makeup artists and beauty editors are calling soft defined brows — a look that sits precisely between the undone naturalness of a completely bare brow and the heavy, constructed quality of a fully filled architectural brow. The hairs are visible as individual elements. The shape is clearly intentional. The color is real rather than drawn. And the overall impression is of naturally exceptional brows rather than carefully applied product.
It is a deceptively simple look to describe and a genuinely nuanced one to execute — because the margin between a beautifully soft defined brow and a brow that simply looks like it has been lightly filled is in the technique rather than the product. This guide covers everything you need to achieve the soft defined brow at home — from understanding the aesthetic principles that define it, to the specific products and techniques that produce it on different brow types and face shapes.
What Makes the Soft Defined Brow Different
Understanding what specifically defines the soft defined brow aesthetic — as distinct from both the undone natural brow and the heavily constructed brow — makes every product and technique choice in this guide significantly more logical.
The Three Qualities That Define the Aesthetic
A soft defined brow has three simultaneous qualities that work together to create its characteristic appearance. The first is visible hair texture — individual brow hairs remain visible as distinct elements rather than being covered by a uniform layer of product that obscures the natural hair and creates a flat, filled-in appearance. The second is intentional shape — the brow has a clear, deliberate shape that frames the eye and face in a flattering way, with a defined but gentle arch and a clean perimeter that reads as groomed rather than wild. The third is natural color — the product used to define the brow closely matches the natural brow hair color and creates density that reads as hair rather than pigment.
When all three qualities are present simultaneously, the result reads as exceptional natural brows rather than as makeup. When any one of them is missing — when hair texture disappears under too much product, when the shape is too geometric or too sharp, or when the color is obviously darker than the natural brow — the natural illusion collapses and the brow reads as applied rather than natural.
How It Differs from Previous Brow Trends
The soap brow and laminated brow aesthetics that dominated the early 2020s created brows that were dramatically brushed upward — sometimes to a degree that exposed the skin beneath the brow hairs and created an almost sculptural quality. The soft defined brow of 2026 retains the upward brushing direction but controls it — hairs are directed upward and slightly outward rather than straight up, and the overall shape follows the natural brow arch rather than disrupting it. The result is controlled and groomed without the architectural quality of heavily laminated or soaped brows.
The heavily filled, ombre, or blocked brow trends that characterized earlier years created brows with a clearly defined perimeter and a uniform color density that read unmistakably as product. The soft defined brow uses product only where the natural brow density genuinely needs support — filling sparse areas with hair-like strokes that blend invisibly into the existing brow hair rather than creating a solid pigmented shape over the entire brow zone.
The Products You Need for Soft Defined Brows
The soft defined brow is achievable with a deliberately minimal product selection — in fact, using fewer products is often what produces a more convincingly natural result than a multi-product approach.
A Fine-Tip Brow Pencil
A micro or ultra-fine tip brow pencil in a shade that matches your natural brow color exactly — or one shade lighter — is the foundational product for soft defined brows. The fine tip is what makes the hair-stroke application technique possible — it deposits color in strokes narrow enough to mimic the width of an actual brow hair, creating definition that reads as density rather than as applied product. A pencil that is too wide or too soft in its point produces strokes that are immediately distinguishable from natural hairs and make the brow look filled rather than enhanced.
Shade selection is the single most common point of failure in achieving a natural brow result. Most people choose a brow product that is one to two shades darker than their natural brow — a habit inherited from years of beauty guidance that equated darker brows with more defined brows. For the 2026 soft defined aesthetic, this approach consistently produces brows that look drawn rather than natural. Match the shade as closely as possible to your actual brow hair color. If your brows are naturally soft or fair, consider a shade that is slightly deeper than the lightest brow hairs but lighter than the darkest ones — the mid-tone of your natural brow range rather than the extreme.
A Tinted Brow Gel
A lightly tinted brow gel — not a clear gel, which provides no color contribution, but not a heavily pigmented pomade either — is the finishing product that sets the soft defined brow and adds the final layer of natural-looking color density that bridges the natural brow and the pencil strokes into a cohesive, unified result. Apply the tinted gel by brushing through the brow hairs in the upward and slightly outward direction that defines the 2026 shape — the gel sets the hairs in place while the tint adds color to the hairs themselves, creating the appearance of naturally full, pigmented brow hairs throughout the arch.
A Clean Spoolie
A clean, dry spoolie brush is the most used tool in a soft defined brow routine — and it is the one that most directly determines whether the result reads as natural or applied. Regular spoolie brushing through the brow hairs — before product application to reveal the natural shape, between product steps to blend and soften, and at the end of the routine to ensure all product is incorporated rather than sitting on the surface — is what creates the seamlessly blended, natural-hair quality that defines this aesthetic. A clean spoolie (free of old product residue) produces significantly better blending results than one that has accumulated weeks of brow product buildup.
Step-by-Step Soft Defined Brow Application
The following sequence builds the soft defined brow from a clean base through to the finished result — with specific technique notes at each step that address the most common execution mistakes.

Step 1 — Reveal the Natural Shape
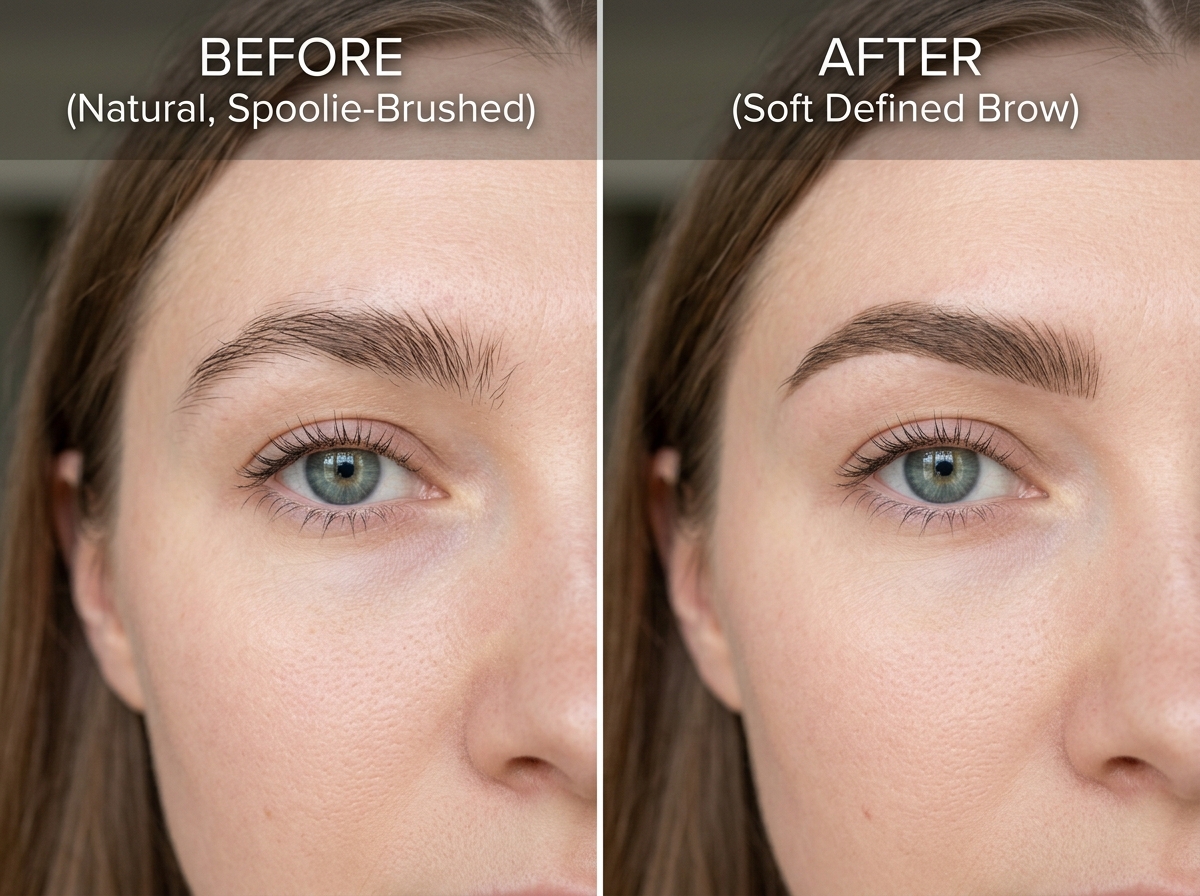
Before any product is applied, brush the brow hairs upward and slightly outward with a clean spoolie to reveal their natural shape and growth direction. This step shows you exactly what you are working with — where the density is naturally full and where genuine sparse areas exist that need support. The most important insight from this step is identifying what the natural brow shape already looks like when the hairs are in their most flattering position — because the soft defined brow enhances this natural shape rather than replacing it with a constructed one.
Take ten seconds to look at the natural brushed shape before reaching for any product. If the brushed natural brow already looks close to what you want — which it often does on brows with reasonable natural density — the product application that follows needs to do very little. The mistake most people make is applying product out of habit rather than in response to what the natural brow actually needs.
Step 2 — Fill Sparse Areas with Hair Strokes Only
Using your fine-tip brow pencil, draw individual hair-like strokes only in the areas where sparse gaps or missing density are clearly visible after the brushed natural shape has been revealed. Work in the same direction as the surrounding natural hairs — upward strokes toward the arch, slightly outward strokes toward the tail — at the same angle and approximate length as the natural hairs in each zone. Each stroke should start thin, widen slightly through the middle, and taper to a fine end — mimicking the actual shape of a brow hair rather than producing a uniform-width line.
The inner third of the brow — from the start of the brow to the arch — benefits from the finest, most delicate strokes in the lightest touch. This zone is where heavy product most visibly reads as applied and where the natural light feathering of inner brow hairs needs to be replicated as accurately as possible for the overall brow to appear natural. Never draw a solid line along the bottom edge of the brow — this single habit is the most reliable way to make a soft defined brow look drawn-on regardless of how natural everything else is.
Step 3 — Blend with the Spoolie
After filling sparse areas with hair strokes, brush through the entire brow with a clean spoolie using the same upward and slightly outward motion. This blending step softens any pencil strokes that are slightly too heavy or too distinct, integrates the product with the natural hairs, and restores the overall brow to the natural brushed direction that defines the 2026 shape. If any area still looks too heavy or too defined after blending, a light pass of the spoolie over just that area softens it further. The finished brow after this step should look like your natural brow with any sparse areas filled — rather than looking like a filled brow that happens to have natural hairs visible in it.
Step 4 — Apply Tinted Gel to Set and Unify
Using a tinted brow gel in a matching shade, brush through the entire brow from inner corner to tail in smooth, upward strokes — setting the hairs in their defined direction and adding the final layer of color depth that creates a unified, cohesive brow color across both the natural hairs and the pencil-filled areas. The gel coat should be light — one smooth pass is usually sufficient. Over-applying gel creates stiffness and product buildup that undoes the natural hair texture that the earlier steps created. Allow the gel to set for thirty seconds before touching the brow area.
Step 5 — Clean Up the Perimeter if Needed
For most people, no perimeter cleanup is needed for the soft defined brow — the natural brow boundary is the intended perimeter of this aesthetic, and any concealer highlighting or sharp-edge cleanup immediately moves the brow away from the natural look and toward the constructed look. If there are genuinely stray hairs outside the natural brow boundary that disrupt the shape, address them with tweezing or threading at a separate grooming session rather than trying to cover them with concealer — the concealer approach always creates an unnaturally sharp brow edge that conflicts with the soft quality this aesthetic requires.
Adapting the Soft Defined Brow for Different Brow Types
The technique above works for most brow types, but specific adjustments produce more flattering results for particular brow characteristics.
Sparse or Over-Plucked Brows
For brows with significant sparse areas or gaps from years of over-plucking, the hair-stroke technique alone may not produce sufficient density to create a believably natural soft defined brow — there may simply not be enough natural hair for the strokes to blend into convincingly. In this case, a brow tinting service or a semi-permanent brow treatment can provide the underlying color density that makes subsequent soft defined brow makeup look more natural and more convincing. The guide on nano brows vs. microblading covers the semi-permanent options for clients who want to address sparse brow density at a foundational level before building a natural makeup look on top.
Full or Thick Natural Brows
People with naturally full, thick brows often need only the tinted gel step from the sequence above — the natural brow density already provides the fullness and color that the pencil step would otherwise add, and the gel simply directs and sets the hairs in the soft defined direction. Adding pencil strokes to an already full brow often produces more density than the natural aesthetic requires. For full brows, focus entirely on shape — using the spoolie to direct hairs in the most flattering direction, the gel to set them there, and any pencil work only at the very tail end where natural brows often thin before the arch is fully defined.
Fair or Light-Colored Brows
Fair or light-colored brows benefit from a slightly deeper tinted gel alongside the pencil — one that adds warmth and depth to the natural hair color without darkening the brow beyond a natural range. Ash brown and taupe tones work beautifully for fair brows where cooler neutrals are needed. Warm blonde and soft brown tones work for brows with golden or warm undertones. The key principle for fair brows remains the same as for all brow types — the product should deepen toward the mid-tone of the natural brow range rather than jumping to a shade that reads as clearly artificial against fair skin and hair coloring.
Common Mistakes That Break the Soft Defined Aesthetic
Even with the right products and the right sequence, a few persistent habits consistently undermine the soft defined result.
Going Too Dark
Choosing a brow product even one shade darker than the natural brow hair is the most reliable way to make a soft defined brow look filled rather than natural. Test new brow products in good natural lighting before adopting them into a daily routine — artificial lighting consistently makes brow product appear lighter than it actually reads in daylight.
Drawing the Bottom Edge
A solid line drawn along the bottom edge of the brow — to create a sharp, defined lower perimeter — is incompatible with the soft defined aesthetic regardless of how natural everything else in the look is. The lower edge of a soft defined brow should be blurred and organic rather than defined and precise.
Over-Applying Gel
Too much brow gel creates a stiff, crunchy brow texture that looks and feels like product — the opposite of the natural, flexible hair quality that the soft defined aesthetic requires. One light coat of tinted gel is the maximum for most brows. If a single coat does not provide sufficient hold, a second pass over just the tail — where brow hairs are often finer and less cooperative — is preferable to applying a second full coat across the entire brow.
Soft Defined Brows Work with Everything
One of the most compelling practical qualities of the soft defined brow is its versatility — it works alongside every makeup look from the most minimal to the most dramatic without competing for visual dominance or looking out of place. Against a no-makeup face, soft defined brows provide the only necessary structure. Against a smoky eye or a bold lip, they anchor the face without adding another strong element that fights for attention. This background quality — beautiful and intentional but never the loudest thing in the room — is what makes the soft defined brow the most universally wearable brow aesthetic of 2026 and, in all likelihood, well beyond it.
For anyone building a complete natural eye and brow look — pairing soft defined brows with a natural lash aesthetic and a minimal eye approach — the guide on how to do the no-makeup makeup look for your eyes covers the full eye routine that the soft defined brow complements most naturally. For authoritative editorial guidance on the best brow products and techniques for achieving natural brow looks from professional makeup artists, the Byrdie guide to filling in eyebrows naturally is one of the most comprehensive and regularly updated references available on natural brow technique. For expert testing and rankings of the best brow pencils for achieving natural hair-stroke results, the Allure guide to the best eyebrow pencils offers rigorously tested product recommendations that pair directly with the technique approach covered in this guide.